
RAW Image Fundamentals
For years, experienced photographers have used and preached the virtues of RAW still-image shooting, compared to working with in-camera JPEG image files. While most users agree on the flexibility and potential image quality benefits of RAW images in today’s digital cameras, many may not be so sure about what a RAW image really is, and what those benefits may actually be. In the next few moments, we hope we can shed a little light upon that.
All the comments here, in general, refer to RAW still image files from any brand of modern digital SLR or mirrorless camera, although of course we’ll refer specifically to Canon-brand cameras and software.
Understanding RAW Images Begins with Understanding JPEGs
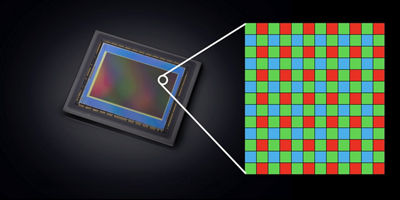
The camera industry doesn’t always do a great job of explaining this most basic of questions, so this is probably a good place to start. Understand that a digital camera’s imaging sensor consists of millions of tiny, individual, light-sensitive pixels — each with an equally tiny red, green or blue filter directly above it. In effect, whenever you take a picture, each pixel acts like a tiny light meter, generating an electronic signal that’s in direct proportion to the amount of light striking it for a particular image (or frame of digital video, although we’ll concentrate on stills here). Brighter areas of a scene generate strong signals; dimmer areas in a scene will produce weaker signals.
Canon CMOS Image Sensor
Digital imaging starts at the imaging sensor, where millions of individual pixels — each with a red, green or blue filter above them — gather light, and generate electronic signals in proportion to the light level each received. (Effect simulated in this graphic)
With JPEG images, these millions of individual signals are instantly sent to the camera’s primary processing unit, quickly analyzed, and utilizing information about the filter color for each pixel’s location, a finished image can be quickly generated and written to the camera’s memory card. This JPEG image will have color information interpolated and rendered; brightness, contrast, tonal range, fine detail, and so on all completed as it’s processed in-camera. The result is what has been termed a “finished file.”
Since an in-camera JPEG is indeed a finished file, it can be viewed even in programs like a word processor or e-mail program; they’re the world-wide standard for posting still images on-line. In simple terms, it’s been fully processed, and is ready for viewing.
The Difference with RAW Image Files
Shooting RAW images is different. Each pixel on the image sensor still individually records brightness at that particular location on the image sensor, along with information about the color of its individual color filter and that of neighboring pixels. But with RAW files, the brightness data from each of the millions of pixels is now gathered, losslessly compressed, and saved onto the camera’s memory card.
This is “raw” brightness data — unprocessed, and stored on the memory card. Things like color of actual subjects in the scene, tonal range, fine detail and so on are not yet processed and turned into a visual file, in the actual RAW image data.
Unlike a JPEG image, full processing is not done to the primary RAW image file, although the camera does immediately produce a lower-resolution JPEG companion file, to allow you to play-back the image on your camera’s LCD screen, view thumbnails when you view the files on a computer, and so on. (You don’t normally have direct access to this embedded JPEG file from a RAW original image, but just understand it’s automatically generated any time you shoot a RAW still image, and it’s part of the Canon .CR3 [or previously, .CR2] RAW image file.)
Canon RAW files are losslessly compressed, in either the .CR3 (or, again, previous .CR2) form. This is totally reversible data compression of the brightness data, and it does reduce file size on the memory card for each RAW image recorded. Again, it must be emphasized, this is lossless compression, so no image data is compromised. For this reason, Canon has never offered an in-camera option for “uncompressed RAW” image recording, unlike some competitors — it would simply generate massive individual files on the memory card, with no real benefit in terms of image quality.
The Benefits of RAW Images vs. JPEGs
Experienced photographers often preach the quality benefits of RAW image files, vs. JPEGs, to less-experienced photographers - and generally, they are referring to at least some of the following:
- Greater overall tonal range, and range of available colors
This is a benefit of 12-, 13-, or 14-bit recording in Canon RAW files, vs. the industry-standard 8-bit recording in processed JPEG files. Less possibility of banding as tones change across an image, potentially greater range of detail in brightest and darkest areas, and greater range of possible colors are among the benefits.
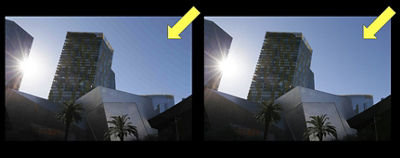
12- or 14-bit RAW Recording - Broader range of tones - less "banding"
The effect is exaggerated here to make it visible, but the left-side image displays banding across an area of slight shifts in color and tone. RAW images, with greater bit-depth (usually, 12-bit or 14-bit per channel) make more tones and colors visible, and minimize risk of banding in processed images.
- Much greater flexibility to adjust tones and colors in RAW processing software
- Ability to completely un-do changes, and revert back to original image, no matter how extensive any attempted adjustments in the computer were performed
- Ability to completely change camera settings, in-place when shot was taken
White balance, Picture Style, Aspect Ratio settings, Auto Lighting Optimizer, Color Space, and more can be changed within a .CR3 or .CR2 image during RAW image processing — without any harmful effects to the original RAW image file. This gives great flexibility in getting the final “look” a user may want in a given image.
In fact, about the only in-camera settings that are “baked-in” with Canon RAW files are White Balance Shift (or WB Bracketing), and High ISO Noise Reduction.
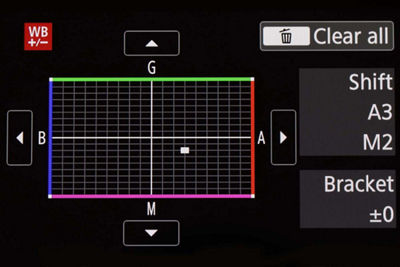
White Balance Correction and WB Bracketing (not basic White Balance settings) and Long Exposure Noise Reduction are the only camera settings that actually affect pixels in Canon RAW files, and remain with the file regardless of what software is used to process it.
Canon .CR3 vs. .CR2 RAW Files
Basically, EOS digital SLRs using Canon’s DIGIC 8 or previous processor units recorded RAW images in what Canon terms the .CR2 file type; this is recorded as the suffix in the file name of any RAW images created. Newer Canon cameras, including all mirrorless models, using the Canon DIGIC X type processors, create an updated file type called .CR3. Canon-brand RAW processing software can view and process RAW images of either file type, so don’t be concerned if you work with both types of RAW images.
RAW Image Processing
Since a Canon RAW image isn’t ready for actual, full-resolution viewing after it’s been taken, it must be fully processed. That’s typically performed at the photographer’s computer, using RAW image processing software. Many recent mid-range and high-end EOS cameras have offered the option of in-camera RAW image processing, as well; we’ll discuss that shortly.
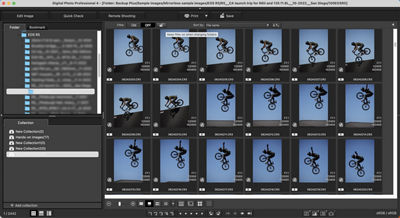
Digital Photo Professional (DPP) is Canon’s RAW file processing software — available free, for compatible Windows and Macintosh computers.
RAW image processing is actually one of the most proprietary, tightly-guarded aspects of modern digital camera design. Canon’s engineers, along with those of some competitors, consider the actual processing steps and procedure to be completely confidential, and they’re not shared with third-party software developers and never made public. And, RAW image processing varies greatly from one camera brand to the next — to some degree, even from one Canon model to the next.
RAW image processing, in general, is an extremely detailed series of repeated analysis of the brightness levels of a given pixel, the brightness of surrounding pixels, and the applications of hundreds or more complex calculations and algorithms — performed repeatedly, pixel-by-pixel, throughout the entire image area. Sometimes called “signal processing,” these calculations are the “secret sauce” of each camera maker’s RAW image processing. In most instances, makers of third-party RAW processing software have to reverse-engineer this to be able to process Canon .CR3 or .CR2 RAW files.
Accordingly, understand two basic things:
- RAW image processing will not be identical, using a camera maker’s software vs. that of a third-party software maker
- One of the reasons that Canon’s RAW processing software — called Digital Photo Professional, or sometimes abbreviated “DPP” — often takes longer to process individual RAW files is that Canon engineers have endowed it with extensive calculation strings. In the interest of shorter processing times, many third-party makers by-pass these small, incremental added steps, which produce increases to basic finished image quality.
Canon users are free to work with whatever RAW processing software they prefer, but keep the above points in the back of your mind.
In-Camera RAW Image Processing
Another option, which can be especially handy if a RAW image shooter has a quick need for a smaller JPEG copy of a RAW file they’ve taken, is in-camera RAW processing. While Canon’s least-expensive cameras (such as EOS Rebel DSLRs, and compact mirrorless models like the EOS R100 and R50) don’t offer this, mid-range and more advanced models do. In-camera RAW processing is normally within the blue Image Playback area of the Menu, under “RAW image processing” or similar wording on the Menu.
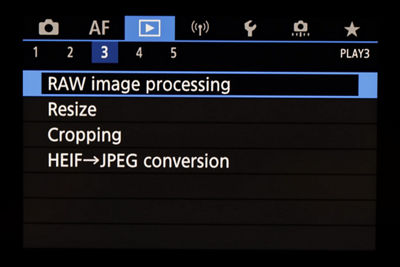
The starting point, in the Playback Menu, for in-camera RAW processing
Basically, the camera’s DIGIC processor can take stored RAW data in a .CR2/.CR3 file, and then use either the camera settings that were in-place when the image was taken, such as White Balance, Picture Style and so on, or allow you to change those on the camera menu, and then process that RAW file into either a standard .JPG file, or a HEIF file (with potentially higher dynamic range and range of colors). Either way, the original RAW file is not affected — it remains on your camera’s memory card — and the processed JPEG or HEIF file is additionally written onto the memory card as well.
Processing in the computer, using most RAW file processing software applications, allows a greater range of adjustments to the original RAW file, than is usually possible with the available adjustments during in-camera RAW processing. Still, in-camera RAW processing is a great option, and one we suggest users try out to become acquainted with.
Reduced-Size RAW Image File Options
Many Canon EOS models from recent years have offered users the option of RAW files that take up less space on the memory card, and accordingly, when stored on your computer or external hard drives.
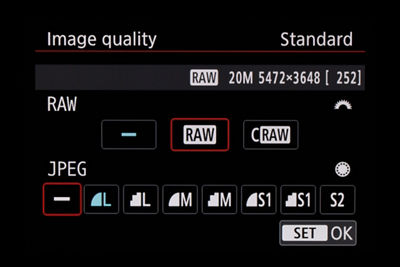
Canon EOS cameras allowing reduced-size RAW options will display it in the Image Quality menu screen. Whether a user selects RAW or C-RAW, it’s always possible to add any one of the JPEG options, and thus have RAW + JPEG recording on the memory card.
C-RAW image files:
EOS cameras in the past few years have offered an Image Quality option called “C-RAW,” which stands for Compact RAW (it is not “compressed RAW!”). Compact RAW files still use the full pixel resolution from your camera’s image sensor, so they always remain 24 million pixel files, or whatever your camera’s maximum resolution is. Unlike a conventional RAW file, however, the information is further reduced in-size, as it’s written onto the memory card. In keeping with the confidential nature of what’s happening within RAW files, Canon engineers have not disclosed precisely how these smaller files with C-RAW are being achieved, but just understand that the aim is to give you the processing flexibility and quality of RAW files, but in a smaller size.
For example, on a 45 million pixel EOS R5 camera, typical RAW file sizes (for the .CR3 file, on the memory card), would be approximately:
- RAW — 45.4 MB per file
- C-RAW — 22MB per file
(Actual file sizes for RAW images can and will vary slightly, from frame to frame, so don’t be alarmed if you see this in your .CR3 or .CR2 images.)
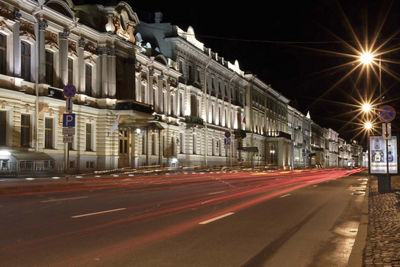
So what’s the difference with C-RAW images? Typically, the tonal range, especially in darker shadow areas, tends to be more extensive in the larger, “full” RAW image files. Normally, this isn’t something that’ll jump out at you, but for users who either accidentally or intentionally significantly under-expose a RAW image, and then lighten it within their RAW processing software, noise levels will typically increase more in C-RAW files. Otherwise, differences in RAW vs. C-RAW images are usually very slight.
M-RAW and S-RAW images:
Some EOS previous digital SLRs, beginning with the 50 million pixel Canon EOS 5DS and 5DS R models from 2015, used a different menu option to reduce RAW file sizes. In this case, M-RAW (“medium” RAW) and S-RAW (“small” RAW) options to images actually did reduce pixel resolution, to achieve smaller RAW files on the memory card. These cameras did not offer the C-RAW option, outlined immediately above — it was simply a different means of achieving smaller RAW file sizes, and arguably useful for photographers who didn’t expect to need full-resolution images for subjects like wedding reception candid images, and so on.
These reduced-res RAW files could still be processed conventionally; they simply had fewer final pixels, and thus reduced overall resolution.
RAW Images and Newly-Introduced Camera Models
Each Canon EOS camera has slight variations in the RAW image files it produces, and will always require newly-updated RAW processing software to work with its images. When new Canon cameras are introduced, Canon simultaneously makes updated versions of DPP software available for free downloading and installation, on compatible Mac or Windows computers. This updated DPP software will continue to work with RAW files from previously introduced camera models, so there’s no problem there. Installing the updated software will remove previous versions of DPP from your computer.
For users of third-party software, a common problem is that their updated software is rarely available during the first weeks after a new camera model is launched. Camera buyers who pre-ordered the latest model from their dealer will usually find that RAW files from it cannot be opened with existing third-party software that may have worked fine with RAW files from other Canon cameras.
Canon can’t be responsible for other software makers’ software update schedules. RAW image shooters with newly-introduced Canon cameras will need to either revert to using Canon’s updated DPP software (again, it’s a free download), or wait to shoot and process RAW files from a new camera model until their software maker of choice provides an updated version.
Summary
The RAW image file option has been a backbone of creative, experienced still-image users since the dawn of digital photography in the very early 2000s. While debate continues in the minds of some about the relative merits of shooting RAW vs. JPEG — let’s face it, there are times when each has its benefits, no matter whom the photographer is — there is little question that RAW files are often the images of choice for serious, experienced photographers.
Rather than add fuel to that fire, our aim here is to simply explain what RAW images really are, for newcomers to the Canon system, provide some insights into their possible benefits and some of the options working with them, and leave each user to make his or her choice as to the file type they prefer to work with, in a given situation. Either way, the combination of a modern interchangeable lens digital camera and the user’s creativity will open the doors to great still imagery.

Thanks for signing up!
The application has encountered an unknown error. Please try again in a few minutes!
By clicking Sign Up, you are opting to receive promotional, educational, e-commerce and product registration emails from Canon USA. You can update your preferences or unsubscribe at anytime.