
Using Two Memory Cards
Many mid-range and high-end Canon EOS camera models have dual memory card slots, allowing users to install and use two memory cards at a time. While users are always free to install only one memory card and simply record stills and/or video files to it, we’ll discuss in this article some of the options available if and when you have two different cards installed at the same time.
As of early 2025, the following Canon EOS cameras offer dual memory card slots (we’ll list only those currently available; this has been a feature in previous, now-discontinued models as well). Many Canon Cinema EOS models also offer this capability, but we’ll limit our discussion to still cameras with video functionality in this article.
- EOS R1
- EOS R3
- EOS R5; R5 Mark II
- EOS R6; R6 Mark II
- EOS R7
- EOS-1D X Mark III (Digital SLR)
- EOS 5D Mark IV (Digital SLR)
- EOS 7D Mark II
As is often the case, menu items may vary slightly, from one camera model to the next, but what we discuss here is usually possible with any of the above-mentioned cameras, when two compatible memory cards are installed at the same time. In general, the options are similar for older, discontinued EOS camera models that are equipped with dual memory card slots… keep in mind that older cameras may not have all the options described here.
Some of the Recording Possibilities with Two Memory Cards
We’ll describe each in detail, but for starters, here are some things you can set-up in your camera when two memory cards are installed:
- Video recorded to one card, and still images to another (note that this has appeared on recent models, and won’t be available on some cameras)
- Auto Switch Card - record to one card, and if/when it fills-up, instantly continue recording on the 2nd card
- Record Separately - record one file type or resolution size to one card, and a different file type/size to the other. (Note that this is possible only with still images, not for video.)
- Record to Multiple - back-up recording function. Same file size/type is written to two separate memory cards, after each image is taken. This can be for stills and video files.
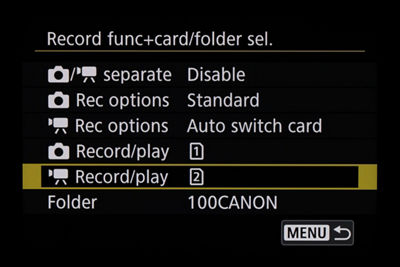
The Record Function + Card/Folder Select Menu
Located in the yellow-tabbed Set-up Menu area, this is the heart of dictating how two memory cards will be used, if and when two compatible cards are installed.
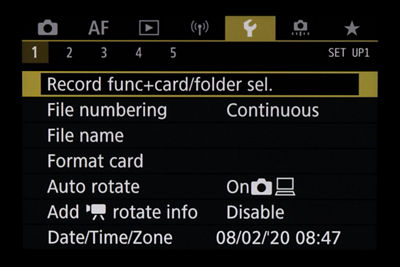
All the commands for managing dual memory card recording are within this Menu item. Press SET with this line-item selected, and the options then appear.
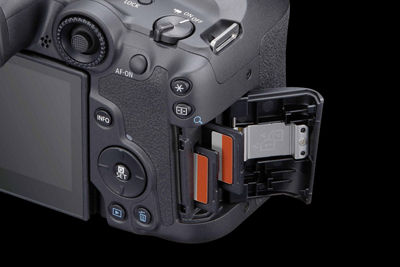
Defining Each Memory Card
Whether your camera uses two different card types (two separate types of card slots), or uses two of the same card types, users need a way to tell the camera which is which, when two cards are installed. Card slots are labeled “1” and “2” inside the actual card door on the camera body; this can be tough to see at the card slots in some cases. Usually, the card closest to the rear surface of the camera — left side slot, as the card door is opened — is considered “Card 1.”
If you’re using just one card, it doesn’t matter which slot you insert it into, as long as it’s a compatible card type for that slot. The camera will automatically register that it’s installed, and just record any video or still files to it.
But when you do opt to install two cards at the same time, you do need to define one as a “primary” card — even if you’re not going to record to both simultaneously. This is done with the still-image Play menu (or video Record/play menu), as shown immediately below:
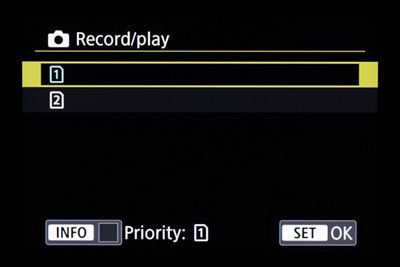
The Play option dictates one card as a primary card, and any image (or video) playback on the camera’s LCD screen or EVF will be from that particular card. As shown above, users are free to select either Card 1 or Card 2 for this purpose; there is no performance difference between these two settings, assuming similar cards are in both slots.
On some camera models, you may just see the word “Play” next to the still-camera icon instead of “Record/Play;” the functionality is the same in either case. These options only appear if two cards are installed; the Play or Record/Play menu options are grayed-out if only one card is installed.
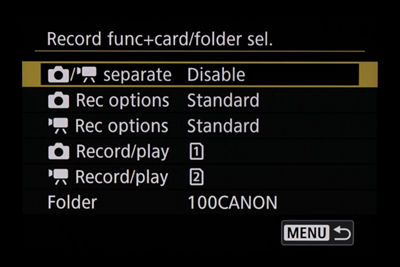
Video and Still-Image Recording: Same Card, or Separate Cards
In the first menu line-item, hybrid still and video users — of recent EOS camera models — have the choice of whether all video and still files will be written to one memory card, or to separate them so that all videos are on one card, and all stills on the other. This is a simple Enable or Disable option; when disabled (the factory-default setting), all recording is done to whichever card you’ve defined as the primary card. You have to enable separate video/still recording onto two cards here.
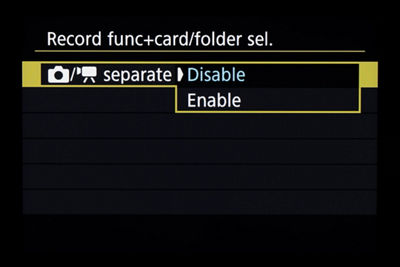
In response to customer feedback, recent Canon EOS cameras have added a simple way to record video files to one memory card, and still images to another. If you enable this memory option, you have to first select which card will record video and which will be used for stills; you have to do this before enabling this feature (see immediately below).
One slightly counter-intuitive step must be taken to separate video to one card, and stills to the other — you have to tell the camera which card will receive which files. The important thing is you have to select this on the menu before you set Still/Video separate recording to Enable. With Still/Video separate momentarily set to Disable, scroll to “Still image Record/Play,” press the SET button or tap the screen, and select Card 1 or 2. Then, you can go back to the first Still/Video separate recording line-item, at the top of the Menu screen. These are the same menu items we just discussed, for selecting either card as your primary card for playback. Once that’s done, you can enable separate stills and video recording, if you want to have it active.

For recording stills and video files to separate cards, before enabling the feature, you need to define each file type to either Card 1 or Card 2. This pair of commands is grayed-out, once Separate still-video recording is enabled; you have to momentarily disable it to make this setting, then re-enable it, if Enable was already selected.
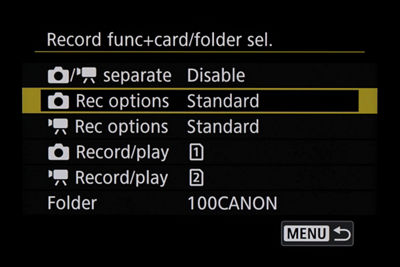
Record Options — the Heart of the Matter
With separate Menu items for still images (still camera icon) and video (video camera icon), it’s here that you can define different recording choices, when two memory cards are installed. They’re almost the same for both the still-image category and for video recording; as previously mentioned, the only difference is that for video, you cannot record two types of video files simultaneously. To be clear, you can select one file size, resolution, FPS rate and so on, and record the same settings/file type to two cards simultaneously — creating an immediate video back-up onto two memory cards. What you can’t do, for video, is create two separate file types — such as 4K recording to one card, and Full HD or slow-motion (high frame rate recording) to the other card.
That said, here are your options:
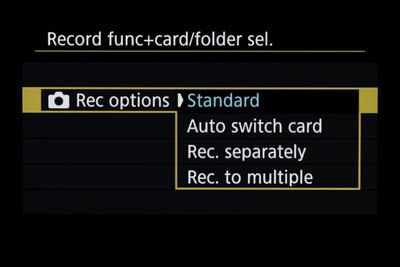
Select from any of the options shown here; as you either tap your choice on-screen, or use a dial to select your choice, a little white arrow points to the one you’re now choosing. Whatever WAS the current choice when you opened-up this Menu option will be displayed in blue type, so you know where you started from.
STANDARD
The factory-default setting. Even with two cards installed, the camera will both write to, and play back from, only the card you’ve highlighted as the primary card (see above). Either stills, video, or both will be recorded to the defined primary card. If you’re recording and the single card you’re recording to fills up, the camera will stop recording, and alert you — on Standard, it does not automatically switch cards.
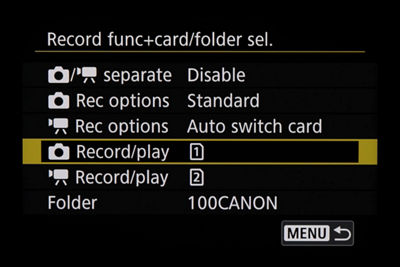
AUTO SWITCH CARD
As its name suggests, this option records first to one (user-defined) card, and if that card fills up, will automatically switch-over to the other installed memory card. Some users prefer this option, to save time during prolonged shooting sessions and avoid having to physically replace cards as often. This does not create a second “back-up” file; it simply records to one card, then automatically switches to the other if and when the first fills up.
RECORD SEPARATELY
This is one many experienced users will reach for (again, it’s for still images only — as of early 2024, you can’t do this for video files). This allows two different types of still-image files to be written — one type to Card 1, and the other type to Card 2.
And contrary to some on-line reports, this isn’t simply for separating RAW and JPEG image files — it’s possible to record two sizes/types of JPEG images onto separate memory cards. For example, full-res, best-quality Large/Fine JPEGs could go to one card, and reduced-resolution, Small/Normal files could be written to the other card.
The only thing you can’t do is record full-size RAW files to one card, and smaller C-RAW files to the other, for technical reasons. Of course, you can opt for either RAW file type, and record those to one card, and any JPEG size files to the other, when Record Separately is active.
There’s one little trick to using Record Separately: once you set it here in the yellow-tabbed Set-up Menu, you then have to go to the red Shooting Menu area, and (with Record Separately active), under Image Quality, tell the camera what to record to Card 1 and to Card 2:
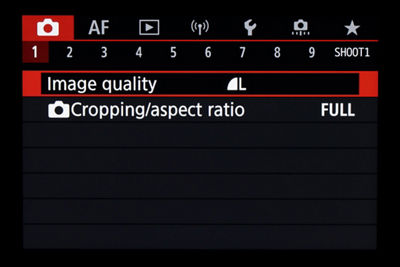
Once you activate Record Separately (in the yellow-tabbed Set-up Menu), you then have to go into the red Shooting Menu, under Image Quality, and define which card will receive which file size/type. This screen shot shows the basic Image Quality menu (we don’t have a screen shot with the Record Separately option enabled). With Record Separately enabled, when you go to Image Quality, it changes and shows separate lines for Card 1 and Card 2. Tap either on-screen, or highlight one and press the SET button, and you can now select what’ll go on that memory card. Thus, you could opt for full-res JPEGs or RAW files to one card, and reduced-res JPEGs to the other.
RECORD TO MULTIPLE
This final option is essentially a back-up function: record the same file size/type to both memory cards, at the same time. Many working pros and serious enthusiasts prefer the security of knowing that they have an in-camera back-up on a separate memory card of image files from an important event or subject; this is how you achieve it. The same file type is recorded to multiple cards. This can include RAW + JPEG still image files, if you’ve selected that beforehand as your primary Image Quality setting, before you start taking pictures. Once again, to be clear, nothing is split up and recorded separately — whatever file size(s) you choose are simultaneously written to two memory cards.
As of early 2025, for cameras that can record RAW video to cards in the camera (internal recording — such as EOS R1, R3, or R5 cameras), it won’t be possible to record RAW video onto SD memory cards. If you have chosen RAW video recording the red shooting Menu, and then apply Record to multiple for simultaneous (back-up) recording, you’ll get the RAW video file recorded to the CFExpress memory card in Slot #1, and the SD card in Slot 2 will automatically be set to record an MP4 “proxy” video file.
Summary
Multiple memory card slots are one of the defining characteristics some users look for, when considering a higher-end camera. Whether prospective or current users are experienced enthusiasts or working professionals, they understand the possible benefits of working with two memory cards in-camera, at the same time.
But it may not be immediately apparent what the actual working options are, or how to get to them. We hope in this article to have clarified both points, and with that, that users of those camera models will give the options a try, to experience what they might allow in different shooting or video recording scenarios.

Thanks for signing up!
The application has encountered an unknown error. Please try again in a few minutes!
By clicking Sign Up, you are opting to receive promotional, educational, e-commerce and product registration emails from Canon USA. You can update your preferences or unsubscribe at anytime.