5 Unique Ways to Use Your Crafting Printer
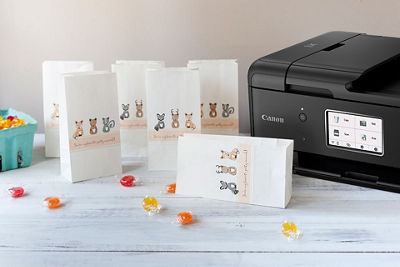
If you’re wondering, “what is the best printer for crafting?” You might want to consider a crafting printer that is capable and useful for much more than simply printing documents. Sure, it can get you through a hard day at the office, but there's no reason to limit it to mundane tasks. Crafting printers are built to deliver excellent quality prints and handle even the most delicate print jobs and printing crafts. From whipping up custom treat bags for a party to creating intricate printable stencils, these printers elevate your crafting game and allow you to produce stunning, personalized projects from the comfort of your home or office.
If you’re looking for the best printer for crafters and some fun things to do with printer paper to create home décor, party favors and gifts, read on.
1. Custom Treat Bags

Custom-printed treat bags add an element of party pizzazz you just can't get with store-bought supplies. They are perfect for birthdays, weddings, or any special event where you need to show off your creative prowess. Begin by measuring your selected paper bag – standard lunch-sized bags work nicely, or you can splurge on those with specialty dimensions. The Canon PIXMA TS9521Ca Wireless1 Home All-in-One Inkjet Printer is a great choice for this project. It supports a variety of paper types, sizes and thicknesses, making it one of the best printer for crafts like these. For example, it can print on paper as large as 11 x 17" – including square prints as large as 12 x 12".
For your custom treat bags, you’ll probably work with smaller bags, so it may be helpful to tape each one onto a piece of paper before feeding it through your printer. Create your design on your computer and print it the same way you would regular paper. Love the outcome? Keep a stack of bags next to your printer for impromptu party bags, gift wraps, or even an extra special lunch sack – the design possibilities are endless.
2. Printable Stencils

Stencils add texture and interest to otherwise plain surfaces, but they can often be costly to purchase and difficult to customize to your exact specifications. With your Canon MegaTank PIXMA G620 Wireless1 All-in-One Photo Printer and some transparency paper, you can create your own stencil print outs and save money for other DIY projects.
Start by selecting a pattern or creating your own design with simple fonts and shapes, then crop or tile your design to fit the dimensions of some plain paper. Print your artwork on the paper and tape it onto a cutting mat (available at a craft or art supply store). Then, tape the corners of a clear transparency sheet over your paper. Using a craft knife or razor blade, carefully slice away the design to create your custom stencil. All you have to do from there is decide where you’d like to paint your custom design, tape down the edges to your surface so the transparency sheet doesn't slip and start painting.
3. DIY Printed Window Clings
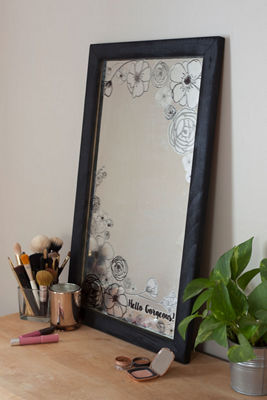
DIY window clings are an easy and removable way to add some embellishment, whether you're decorating your home for the holidays or accessorizing a boring bathroom mirror. You won’t need to settle for generic designs when you learn how to make window clings with your Canon PIXMA TS9521Ca Wireless1 All-in-One Inkjet Printer and some window cling paper. These clear sheets of floppy plastic are printable on one side and cling to the glass on the other, so the printer ink doesn't transfer to the mirror or window. Plus, the low-tack adhesive is both easily removable and reusable, so you're never stuck with the same old design.
Here’s how to make your own window clings: Begin by selecting an image or creating custom artwork using graphic design software. Then simply print the design to the window cling paper (you may need to print in reverse if you're displaying type through a car window), peel off the backing paper and apply your creation to the glass.
4. Candle Wrap Crafts
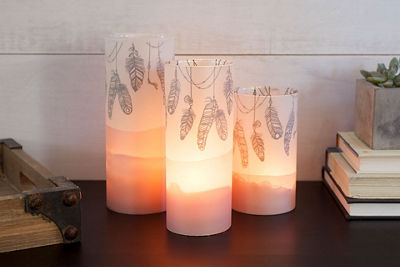
With a sheet of clear acetate, you can dress up plain glass candleholders with custom designs that can be changed on a whim. Begin by downloading a favorite pattern or creating one of your own, then use your Canon MegaTank PIXMA G620 Wireless1 All-in-One Photo Printer to reproduce the design on a piece of acetate. After you've trimmed the acetate to fit inside the glass holder, secure it with a strip of double-stick tape. Add a candle or a few fairy lights to finish the effect. It's a great way to jazz up a single candle or create an array of designs at varying heights. To add a pop of color or mute the illumination slightly, add a piece of plain or dyed vellum paper trimmed to the same size as the acetate.
5. Full Head Masks

Need to transform into a lion, astronaut, or maybe even a mythical creature for a party? You can! And you don’t need magic or a fancy costume shop – all you need is matte photo paper, some string, and your Canon crafting printer. Start your masquerade by visiting the Canon Creative Park. Pick a mask from the many fun designs and print out the parts. Before you cut out the parts, remember to write the part’s number at the back of the part so you can track which part is which. Once all parts are complete, follow the assembly instructions and bring your creature to life. Strap on your creation and behold the transformation.
Whether you're a seasoned crafter or just starting out, Canon’s craft printers can be your great partners in craft. Instead of limiting your printer to regular print jobs, push the boundaries by tapping into its versatility. Experiment with these playful projects and watch as your ordinary printer turns everyday materials into spectacular creations.
- Wireless printing and scanning requires a working network with wireless 802.11b/g/n capability, operating at 2.4GHz. Wireless performance may vary based on terrain and distance between the printer and wireless network clients.


