The holidays are filled with festive parties, buffets of beautiful food, and glimmering trays of cocktails. You don’t have to be a professional photographer to make the most of this time. Creating a stunning cocktail image can be simple if you follow these suggested tips.
Ambiance is one of the most important aspects of cocktail photography. Beyond the glass or the drink, the setting tells a greater story. Is the main reason for the image to tell about a specific ingredient or recipe? Is the purpose to celebrate a specific moment, or a specific location? These questions will allow you to understand what sort of background to use and what sort of elements are necessary in your frame.
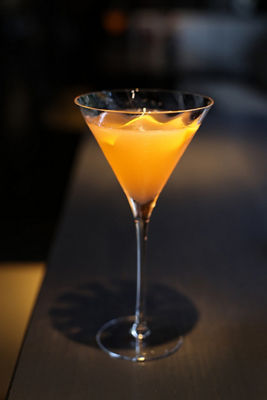
If you are photographing cocktails at home, consider the background and think about the story that you want to tell. Do you want to photograph against a solid black or white background to highlight the ingredients in the glass? Are you setting a holiday party scene, with your cocktail on a coffee table in front of a tree and open fire?
On location cocktail photography comes with its own benefits and challenges. Modern day cocktails are often photographed inside a dimly lit bar, and so many of those bars emulate the style of speakeasy life from days gone by. The style of perfectly crafted beverages, and recreated interiors of bygone eras can be exciting, but the limited light makes photography a challenge.
Perhaps the most exciting time in the history of cocktails was Prohibition. Alcohol was forbidden, and speakeasy culture emerged in cities across America. A bar could be hidden underground, or in an unmarked doorway on a dimly lit street, requiring its patrons to know a secret code word or special knock for entrance at the door. New York, Chicago, Los Angeles and San Francisco are just a few cities that have embraced this time period and successfully recreated the ambiance and atmosphere of that era in their bars. In order to successfully photograph in some of these darkly lit, interesting locations you will need a few tips.
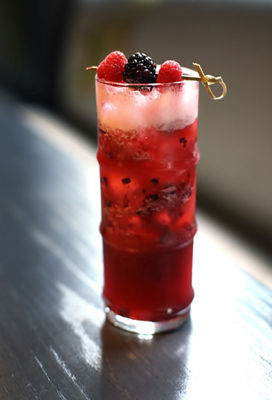
Natural light for cocktail photography can be stunning, and a bit tricky. Set the cocktail in front of a window or a lighting source, like a candle, for best results. This will illuminate the contents of the glass. You can use a second light source to one side (a corner window is perfect for this, or an additional candle) to eliminate unwanted shadows on the cocktail. Don’t despair if you only have one light source. Just experiment with moving the cocktail to have the light source behind it and to the side and see which image you like best.
Tips for Working with a DSLR Camera:
If you aren’t familiar with the Manual settings on your DSLR camera, use the Aperture Priority for the best results. Some cameras have a Scene Mode for food that makes the food look fresh and vibrant.
Aperture Priority Mode will allow you to select the appropriate aperture (lens opening) and your camera will do the rest. In low light situations, it is best to use a wide lens aperture (lower number f-stop) on your camera. This allows more light to enter the camera and reach its imaging sensor, and allows using faster shutter speeds as well. If your lens can open to apertures like f/2.8 or f/3.5, this will allow much more light than an aperture like f/8 or f/11, for example. If you're using a standard zoom lens, you may not have apertures this wide, but use the lowest f-numbers your lens will allow. With these wide lens openings, you sacrifice some depth-of-field, and you will notice an increase in blurriness in your background. This blurriness can actually be an advantage in cocktail photography, forcing the viewer's eye on the cocktail, rather than the background information.
Ideally, a tripod will provide the steadiest platform for your camera, and give you the greatest chance at sharp pictures. With a tripod, it's a good idea to use your camera's 2-second Self Timer option, so the action of pushing the shutter button doesn't cause camera shake or vibrations.
If you don't have a tripod, resting your elbows or the camera itself on a solid, flat surface can help with minimizing the risk of camera shake. Lenses with Image Stabilization give you yet another advantage in hand-held, low-light shooting, so be sure it's turned on if you have this feature.
Low light shooting normally means using high ISO settings, but remember that the higher the ISO is, the more digital noise you'll end up with in your pictures. With a tripod, it's easier to stick to lower ISOs (like 100 or 200), and the resulting slow shutter speeds, and still get good, sharp pictures. Hand-held, you'll probably need to raise ISOs in low light, but don't immediately jump to your highest ISO settings. Try settings like ISO 800 or 1600, and see if you get reasonable shutter speeds at those wide lens apertures.
Use natural light to really capture the ambiance of a cocktail bar even if you are photographing at home. If you find that the scene is too dimly lit for your camera, then add votive candles to enhance the existing light. To really make the cocktail glow you can place a single votive candle directly behind the glass if it doesn’t have a stem. This illumination will turn any colored drink into something mesmerizing to the eye. With clear drinks, place the candle to the side, so light bounces off the liquid. You will have a highlight side and a shadow side to your scene, which is far more dynamic than a cocktail that is evenly lit. With colored, milky or bubbly drinks, you can place the candle behind the glass to exaggerate the appearance of texture and bubbles.
Use a bounce card (white card or paper) from below and in front to add light to the front if necessary. This will add a subtle fill-light to the image and is very helpful in situations with incredibly low light.
How close should you be to the cocktail? If you have a good macro lens on your camera, then you can get as close as you want. If you don’t have macro capability, or are using a point-and-shoot or smartphone, then the closer you are to the cocktail, the less control you will have on the focus. Put some space between your camera and your drink for best non-macro lens results. A distance of two to four feet away from your subject should be plenty of space to allow your lens to properly focus on the cocktail and help you to achieve the best results.
Try photographing your cocktail from a variety of different angles. Remember that although your cocktail is a stationary item, you can move 90 or even 180 degrees around the cocktail to find the best angle and light.
Styling tips:
• Pay attention to the details!
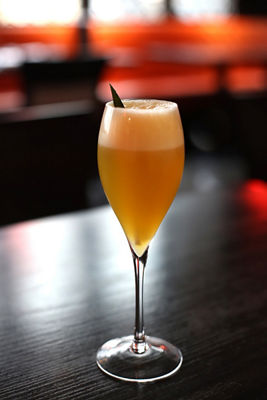
• Use a glass that properly compliments the drink. You wouldn’t use a Martini glass for a Daiquiri, for example.
• Does your cocktail have a front side? Look to the garnish to see if there is a specific “face” of the drink.
• Dust, scratches, and dings in the glass will all show up in your final shot. Be sure to properly wipe down and clean the glass before you begin the shoot. If you are in a bar, bring a small dust-proof cloth (like a lens or eyeglass cleaning cloth) with you to dust off the base of the glass before your final shot.
• When photographing cocktails the structure of the actual drink can change quickly. The ice can melt, the foam can fall, and the bubbles can flatten. Use a stand-in glass, or a glass of ice water first so you can prep your image and finesse your camera settings before you ask for that expensive cocktail.
• Ice is such an essential part of any cocktail and melts rapidly. Remember this when you are photographing and be sure to work quickly enough with each glass before the ice melts. Once the ice is melted move on to a fresh drink. If you are photographing at home, you can make clear ice by first boiling water and then freezing it in Tupperware, which you can then break into professional looking blocks.
• You can create your own condensation on the glass by using a spray bottle and misting immediately before you shoot. You can also freeze the glass for five minutes to add to the frosty look and increase condensation.
• Garnish can often be the most colorful and interesting aspect of drink photography. Many cocktails are made from similar ingredients, and share a color palette. Adding garnishes to the image can add color. Try using slices of limes, or shavings of an orange peel. You can also add the whole fruit in the background. You can showcase a pile of mint leaves, or half of a lemon.
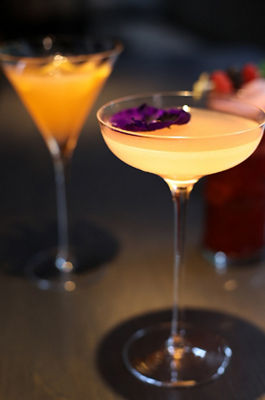
• Select a background with appropriate contrast. If the cocktail is made from dark liquid, try using a background that is lighter in color to make the drink stand out.
• For extra bubbles you can add a dash of salt to beer or Champagne immediately before you shoot.
• Select the right viewing angle. Try photographing your cocktail from above, from straight on, and from a lower angle. After viewing the images decide which angle you like best. Each will offer a very different result.
• Reflections can be a beautiful aspect of cocktail photography. If you can wet the surface below the drink, you can get some interesting reflections from the glass.
• Focus on one thing in your image. If you are using a very shallow depth of field, try focusing on just the rim of the glass or on the garnish and allow for all else to fall out of focus.
Take many photos. It’s digital, so take as many images as you need to get the perfect shot.
It’s ok to get messy and play!
Remember to ask yourself what story are you telling. If you are in a bar setting then try an image or two with the bartender in the background or hands making the cocktail.
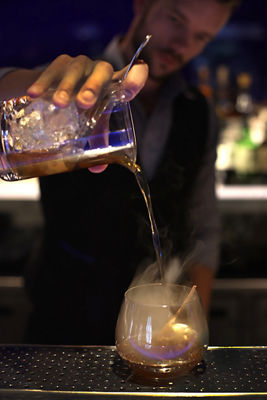
Horizontal or vertical are both acceptable for cocktail photography and the choice is up to you depending on how much negative or empty space you want in the image. Try photographing both ways and see what appeals to you most.
Lastly, when photographing at a bar or restaurant, remember to plan your shots in advance. It is considerate to let the bartender know that you are planning to photograph your cocktails and ask if that is allowed. Take only a few shots so that you can enjoy your drink and let everyone else around you enjoy theirs. Go early in the day if possible, so that you have more time creating your image, and you aren’t disturbing other guests. Have fun, and enjoy!
Photographing for a wide and varied range of clients has allowed Liza to refine her ability to tell strong visual stories that support both the vision of a creative director and brand integrity. In 2014, she worked as the Senior Digital Photographer for Williams-Sonoma where she helped to define the new look of their eCommerce site, and has also photographed for clients including Restoration Hardware, Party City, Safeway, and Hyatt Hotels, among others. Liza is a Getty Image Contributor, and has photographed eight cocktail and food cookbooks for numerous publishers in the US, including Random House.
In 2010, Liza was Governor Jerry Brown's campaign photographer, and in 2014 was the lead photographer for the RedBull Youth America's Cup Team NZ2. Many of her additional clients have included celebrity chefs, wineries, beverage brands, restaurants and more.
Liza's passion for storytelling extends beyond her photography into writing, with many published essays in top magazine and newspapers.
Liza is honored to contribute to Canon USA.
Published books include:
- The Good Cook's Book of Tomatoes (SkyHorse Publishing). 2015
- The Good Cook's Book of Mustard (SkyHorse Publishing). 2015
- The Good Cook's Book of Oil & Vinegar (SkyHorse Publishing). 2015
- The Good Cook's Book of Salt & Pepper (SkyHorse Publishing). 2015
- The Good Cook's Journal (SkyHorse Publishing). 2015
- More Than Meatballs (SkyHorse Publishing). 2014
- Be Fabulous At Any Age (Lions Gate Corporation). 2013
- San Francisco Entertains; The Junior League of San Francisco’s Centennial Cookbook (Favorite Recipes Press). 2011
- A Taste for Absinthe (Clarkson Potter, a division of Random House). 2010
Liza's Publications include: Maxim.com, SI.com, Outside Magazine, Huffington Post, Wine Spectator, NBC Bay Area, Chicago Sun Times, C Magazine, Daily Candy, SF Gate, San Francisco Chronicle, Seattle PI, Tasting Panel Magazine, Food & Wine.com, Marin Magazine, 7x7, Fairfield County Look, Eater SF, Destination I Do Magazine, Grace Ormonde Wedding Style, Bloomspot, Beer Connoisseur, Wine X Magazine, Publisher’s Weekly, Table Hopper, Nightclub & Bar, Gig Salad, Tasting Table, MindFood (Australia and New Zealand), VSCO, and Food Arts Magazine to name a few.


