No macro lens? No problem! Although it may seem like the world of macro photography is out of reach and a world apart from our own, shooting macro is more accessible than you might think. From rigging your current gear, to creating DIY setups that tackle challenges like lighting, I’m here to be your guide for all things macro! My name is Matthew Cicanese (sick-uh-knees). I’m a National Geographic Explorer, documentary artist, and Canon USA Photographer who leads EOS Destination Workshops specializing in macro photography. I shoot macro subjects all over the world, from my own backyard to the rainforests of Sri Lanka! I’ve been a macro photographer for over ten years now, and have evolved along the way to overcome different challenges in macro and produce award-winning photographs. My goal with this article is to teach you how to accomplish more using less – less money, less frustration, and a drop of ingenuity.
Let’s get started!
Assess and Adapt Your Existing Gear
When starting off in macro, a lot of people (myself included) think that they have to have an elaborate DSLR setup or “dedicated” macro lens to be able to take any macro photographs. This is not the case. With the right tools and mindset, macro photography is a genre that is accessible with just a few simple, inexpensive steps in the right direction. The easiest way to get involved with macro using less, is to adapt with the gear you already have using some simple attachments.
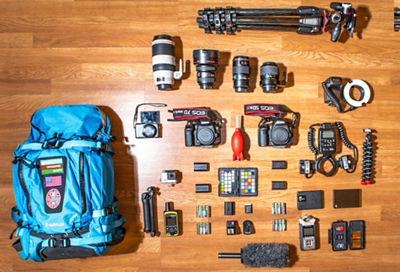
The first recommended attachment is a set of close-up lenses (also called close-up filters or macro filters). The least expensive option are generic, close-up filter “sets,” available at camera stores and online. They’re often sold as a set of three, sometimes labeled “+1,” “+2,” and “+3.” They screw into the front of your lens like a conventional filter, and can be combined for greater magnifications. These filter sets are a great way to get your feet wet with macro shooting. The catch? Optical performance is often only fair-to-middling.
Canon offers two close-up lens options, with the Close-up 250D and 500D lenses. These are double-element optics which similarly screw into your lens like a filter, but can be expected to deliver sharper performance than single-element close-up attachments. The 250D is optimized for lenses from 50 thru 135mm, and the 500D works best with lenses from 70mm thru 300mm. They’re available in a range of sizes to attach to many (but not all) Canon EF and EF-S lenses.
Another great attachment to try with macro is a set of extension tubes. These small, metal lengths of tubing that sit between your camera and lens act like bellows on an old camera, to increase the distance between your lens and your camera’s sensor. Using extension tubes like the Extension Tube EF 12 II or the EF 25 II can enable a wide variety of lenses to be used in a macro-sense, by allowing you to get closer to your subject — but it comes at a cost. Extension tubes reduce the amount of light entering your camera, but if you use your in-camera metering, no compensation is usually necessary. Auto exposure modes like Aperture-priority (Av on Canon cameras) can be a quick and effective way to work with close-up accessories in the field.
Macro Myths Dispelled
In your path to becoming more proficient in macro photography, you’re bound to come across opinions that are made out to be rock solid rules to achieving macro shots. “Always shoot macro with a tripod. Never use an ISO higher than 100. Always use a flash for the best light.” But the universal truth, which can apply to any genre of photography, is that there is no precise recipe for successful photographs.
A great way to learn more about macro and ways of shooting is through social media forums. Groups like these are (usually) friendly, moderated environments where you can post your shots and see the work of others. It’s a wonderful way to make new friends in the macro community, get feedback on your work, and even meet up with others to shoot macro together! Be warned though, these types of groups and forums are breeding grounds for myths like the ones mentioned above, and you should always take advice you get from those places with a grain of salt.
It’s All About the Light (natural light, Speedlites, & long exposures)
At its core, the very nature of photography comes down to light itself. Light is what illuminates your subjects, and shapes how they appear in your photographs. Like a person, light has different personality traits that will affect the overall look and feel of your macro photos. Let’s dive into three light sources to learn about their pros and cons, and when to best utilize each type.
Natural Light
Natural light can be a great source of light for macro photography in the right conditions. It offers hours of non-stop use without the need for batteries (as opposed to Speedlites) and can create effects that other light sources can’t. Depending on what time of the day you shoot, the characteristics and qualities of natural light change. If you utilize this to your advantage, natural light can provide you with a variety of styles for your macro photography throughout the day. When the sun is below the horizon (before sunrise and after sunset) the “blue hour” brings cool-colored tones and has a nice evenness to it. During the golden hours of the morning and evening (when the sun is just above the horizon), the qualities of the light are very warm. This is also a great time to see the dynamics of the environment for your macro (i.e. — sun rays coming through the trees and dew on the plants).
The downside to using natural light is the unpredictable patterns it can have. One moment it may be bright and sunny, while the next your light could disappear due to passing clouds. Vice versa, if you’re shooting with soft, diffused sunlight through the clouds, and the clouds break — you’re left with a harsh light source with strong shadows and too much light. Natural light also makes it harder to take creative shots by shaping your light, because there aren’t that many ways to shape natural light. You can diffuse it if it’s too harsh, but if it’s too dark out there’s not really a solution. Being dependent on a light source you can’t control has more limitations than other light sources (such as Speedlites or flashlights).
Natural light is best utilized during the golden hours and blue hours where the light is the most dynamic. This provides a range of color tones and characteristics (such as sun rays). The other time when natural light is very useful is on overcast days, where evenly distributed cloud cover creates a softbox for the sun. This diffused light is great for providing even, consistent light — as long as the rain stays away.
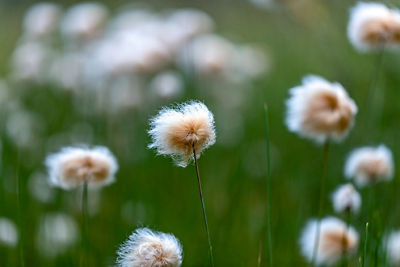
By photographing this cotton-grass in natural light on an overcast day, I was able to get a really even spread and good quality of light that didn’t produce any harsh shadows. I was also able to open up my aperture (to f/2.8) to produce some nice, soft, bokeh that helped isolate the subject.
Pros
- No batteries required! You can use natural light all day long and never have to reach for your battery bag.
- Variety. Using natural light for your macro will provide you with a wide spectrum of different light moods throughout the day.
- Golden Hour: Sunrise and sunset bring warm, golden light (called the “golden hour”) that is great for flowers, insects, and water drops in nature.
- Blue Hour: The hour before sunrise and following sunset (called the “blue hour”) give a very different mood for macro photographs – with deep hues of blue that cool off your scenes and give them drama in many cases.
Cons
- Unpredictability. Because it’s uncontrollable, natural light can be really unpredictable. If it’s your only source of light, this can present problems when shooting macro. If it’s golden hour and it suddenly gets cloudy, you’ve lost your shot. If it’s midday but cloudy with a soft light quality, then clouds disappear, now the harsh midday sun is going to cast bad shadows on your subject.
Best uses
- For golden hour and blue hour shooting where the natural light on macro subjects is the most dynamic
- For large macro scenes during cloudy days, where the light is softened by the cloud cover
Artificial Light (Speedlites)
Perhaps the largest challenge in creating natural-looking macro photographs (besides getting tack-sharp focus) is lighting your subject. As the environment changes from subject to subject, Speedlites offer the most reliable and consistent forms of light. Speedlites like Canon’s 600EX II-RT allow you to dial in exactly how much light you want to fall onto your subject. When you pair this amount of control with Manual mode on your camera, it gives you the most options to get your pictures exactly how you want them to look. With Canon’s wireless transmitter unit ST-E3-RT, you’re able to use your Speedlites off-camera, and control up to 15 flashes in up to 5 separately-controlled groups.
The downside to using Speedlites is that you have to have a power source for them. If you’re on a heavy shoot and taking lots of frames with the Speedlites at full power, you’ll need to bring extra batteries. Another challenge to shooting with Speedlites is that you have to soften the light that comes from them. This can be done in a variety of ways — from bouncing the light off of a white surface, to using a reflective umbrella.
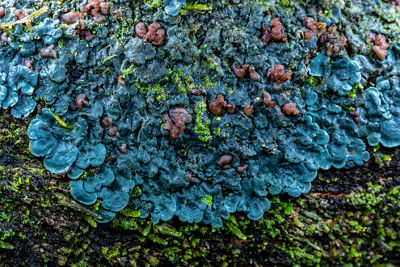
By using a Speedlite unit, small flash diffuser, and small aperture, I was able to get a subject like this blue lichen in complete focus under the canopy of a dark forest. f/13; 1/200th sec.; 100mm; ISO 125.
Pros
- Very controllable (amount of light)
- Predictable (directionality & characteristics of that light)
- Consistent (As long as you have power, you have light. No waiting for the golden hour to come, etc.)
Cons
- Batteries required (recharageable AA-size NiMH batteries are a great investment!)
- Additional accessories needed (i.e. – light modifiers or radio triggers for off-camera flash)
- More setup required before you can get the shot
Best uses
- For a wide range of shooting without limitations to time-of-day, quality of light, or where the light lands on the subject.
Long Exposures (light painting)
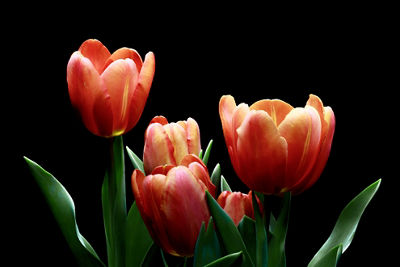
One of the least-used methods for getting light on macro subjects is by long exposures. When shooting long exposure macro photographs, the light is literally painted by moving the light souce, such as a flashlight onto the different parts of your subject over a period of time (i.e. – 3, 5, or 10 seconds). The nice part about long exposure light painting for macro is that it allows the most amount of control over where your light falls onto your subject. By locking your camera into a sturdy tripod and working in a controlled environment (i.e. indoors), you can control every element of the photograph.
The challenge to shooting long exposure macro photographs is that it requires a lot of setup, a larger time commitment, and much more trial and error to get the shot. However, this type of shooting can allow you to create photographs that illuminate certain aspects of your subject and have complete control over the scene.
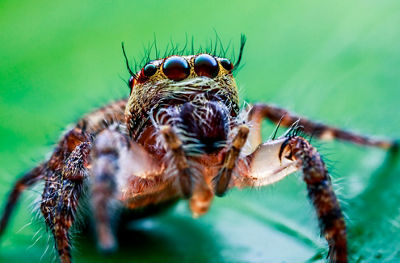
A 5-second exposure (f/16, ISO 100) of some tulips in a pitch dark room. The light landed exactly where I needed it to by painting it onto my subject using a small, continuous light source.
Pros
- Extremely controllable in regards to where the light lands on your subject (you paint it on)
Cons
- Requires tripod
- Requires darkness
- Longer time commitment
- Requires more controlled conditions (i.e. – no wind)
Best uses
- For controlled environments where you want to create drama and emphasize key part of your subject using hand-painted light.
Sharpening Your Mind Before Wielding Your Camera
To me, macro photography is a very meditative process. It gives me a chance to see and explore the world around me at a much slower pace — and as a result, experience details that would otherwise go forgotten. When it comes to shooting macro, I spend at least half of the time in deep observation without my camera to eye. This mindfulness is something I practice each time I shoot, and a skill that I always pass on to my students. By observing the world through your eyes first, it eliminates the desire to constantly press the shutter, and gives the mind a chance to see and digest the scene you’re experiencing. When you’re studying the scenes you want to photograph in deep thought and not simply trying to get “the money shot,” you’ll naturally achieve stronger macro photographs.
The most important thing to remember when it comes to shooting macro is not to get discouraged. It takes a lot of practice to learn how to shape your light around your subject, utilize Manual mode to achieve the desired results, and compose macro photographs in a way that tells a story. The macro world can be very daunting at times, even for seasoned professionals like myself. When a heartbeat or minor camera setting can be the difference between getting and missing the shot, it’s easy to get discouraged. What’s important for the process of improving in your macro photography, is not to give up when things get challenging.
Summary
To summarize:
- Assess & adapt your existing gear
- Get a lay of the land for what gear you have, and how you can adapt it to help you achieve macro shots (like adding close-up filters or using extension tubes).
- Dispelling Macro Myths
- Don’t let opinions or myths get in the way of your shooting. If you shoot a certain way and it works for you, then keep doing that!
- Using the right light
- Learn what your favorite light source is for macro photographs, and how to creatively use that light source. Learn when to use each type of light depending on the scene, and how those light types tell the story in certain ways.
- Sharpening your mind
- Macro photography is a meditative practice. Learn to observe the world around you without necessarily having the camera to eye. This will sharpen your observation skills, and in turn, help you produce better macro photographs.
- Don’t get discouraged
- Macro photography is a very challenging genre to be proficient in, so it’s important to remember that half of the fun is just being out in nature experiencing the scenes before you even take the picture!


