Introduction
There’s nothing quite like creating a tack-sharp macro photograph. When the light is hitting your subject just right, and everything you want in focus is sharp, it’s a really rewarding feeling. However, the genre of macro photography can present challenges to creating consistently sharp images. This article will provide you with some of the knowledge needed to create macro images with excellent sharpness, straight out of camera.
Lack of Sharpness Due to Motion Blur
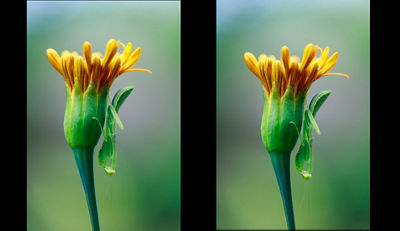
One of the most frustrating feelings is to see the perfect macro scene through your viewfinder, only to have the photo you take turn out blurry. What could have caused this blur? There are many factors that can contribute to this result. The most common culprit is motion blur caused by a lengthened shutter speed, combined with movement of the camera or scene.
As a nature and wildlife macro photographer, wind is a very common environmental element that I’m faced with when shooting macro. The wind, if only even a slight breeze, is enough to cause significant effects on macro scenes taken at higher magnifications, and render them nearly impossible to get sharp if using a longer shutter speed. This increased shutter speed often happens if shooting in Auto, Program, or Aperture Priority modes. When the camera calculates a longer duration for shutter speed to achieve a proper exposure, this creates the opportunity for motion blur to occur.

Whether it’s the entire frame being blurred from shooting handheld, or a subject in your scene scuttling around, there are solutions to correct this and achieve a sharp macro image. Motion blur created as a result of a longer shutter speed can be fixed by switching to Manual Mode (M) or Shutter-priority (Tv) Mode. These camera modes allow for you to fully control your camera’s shutter speed, and we can use this ability to correct the motion blur that occurs. By using a faster shutter speed (such as 1/200th sec and higher) we can completely freeze any movement in a macro scene. Keep in mind — when you adjust your shutter speed manually, you will need to compensate for this change in the other areas of your exposure (aperture and ISO).
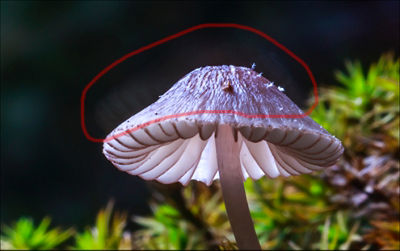
Let’s observe this in action. The image below takes us to the dark understory of a mountain forest, where there are lots of macro subjects such as this fungi rising up from a sea of green moss. My goal was to photograph the mushroom to illustrate the feeling of being a bug exploring this little world. Because of how low to the ground the scene was, using a tripod was not an option. By placing my camera directly on the forest floor, I was able to get the perspective I wanted — the next challenge was lighting the scene.
My first thought was to use a small LED light and a slower shutter speed to light paint the entire scene. I was attempting to give the perception that the mushroom was glowing, and to do this I used a long exposure (½ second). However, the slightest movement of either the camera (which could have included the mirror movement in-camera) or subjects within the scene caused motion blur to occur. The second image shows this motion blur in detail at 100% crop. This ghosting effect is evident by the area circled in red — showing where the subject moved in relation to the camera during the exposure.

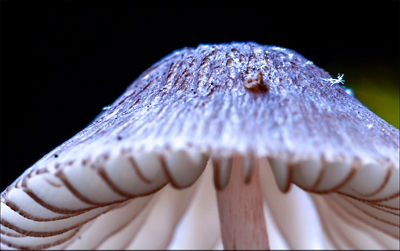
I was able to solve this issue (in this particular case) by using a faster shutter speed (1/200th sec vs. 0.5 sec) and an off-camera Canon Speedlite (the 600EX II-RT). The results of these simple adjustments speak for themselves in terms of edge sharpness and lack of ghosting due to camera or subject movement.

Depth of Field (DoF) as an Image Sharpness Tool
Depth of field (DoF) is defined as “the distance about the Plane of Focus where objects appear acceptably sharp in an image.” It’s controlled in your camera by adjusting the aperture (also called the f–stop) of the lens. DoF can greatly contribute to a macro image being sharp or a complete flop depending on your settings. When you want your subject separated from the background of your scene, using a shallow DoF (such as f/2.8) can help achieve that. A shallow DoF is best for natural-light shooting and produces a very soft, airy feel to the scene captured. These characteristics are ideal for featuring one particular part of the scene (i.e. one flower of many in a field), while still retaining the light and color from the surrounding environment. A deeper DoF can be achieved a number of different ways. The two primary methods of this are the use of a smaller aperture setting (i.e. f/16), or creating a focus stacked composite image.
Using a smaller aperture setting such as f/16 allows for a greater DoF in a single frame, but also presents potential issues with light levels, fringing, and lens diffraction. Shooting with smaller apertures will either require a longer shutter speed, higher ISO, or the use of an external light source (such as a Canon Speedlite). Often, the best option is to use an external light source, since a longer shutter speed can introduce motion blur, and a higher ISO will introduce noise. By using an external source of light (such as an off camera flash), you can still shoot at a fast shutter speed with a low ISO. The result is a low-key style of lighting with everything having a large DoF, and little to no noise.
Even at your lens’ smallest apertures, like f/22 or f/32, you may find you still don’t have the extensive depth of field you may have wanted. At macro focus distances, even a small subject like an insect or flower may not be sufficiently sharp, front-to-back. For years, before digital imaging, the only effective solution was to move farther back, and live with the reduced magnification. But with digital imaging, another technology becomes available to critical macro photographers: focus stacking.
Focus Stacking for Improved DoF
A focus stacked image is a single composite image in which back-to-back frames with sharpest focus at various planes have been selectively merged together in post-production. They are created by using specialized software to stack back-to-back frames that have a shallow DoF, to achieve a greater final DoF without the loss of light from the surrounding scene. This method also helps eliminate the potential for fringing and lens diffraction that you may otherwise get when using a smaller aperture. In other words, instead of shooting at something like f/22 for each image, you could shoot at an aperture like f/8 or f/11, where most lenses are at or near their peak optical performance.
The process of creating a focus stacked composite image varies in difficulty depending on your setup for producing the sequential images, the number of images used, the accuracy of your shooting, and the chosen software for merging the frames into a single composite. In order to create a successful sequence of images for a composite to work correctly, I would first and foremost recommend using an indoor environment for your setup. The use of a sturdy tripod and remote shutter release is critical to ensure your camera does not move at all during the creation of the sequence. Another useful piece of hardware is a focusing rail. Focusing rails are instruments normally attached to a tripod, and used to adjust your camera’s position in Z-space (depth), with extreme precision — more than most users can achieve by simply turning a lens’ manual focus ring. Some also allow for X-axis adjustment (L/R direction) as well. The price and quality varies depending on whether it’s motorized or not, how accurate the adjustments are, and the material build quality.
To create a sequence of images for a focus stacked composite, you would prepare your subject/scene indoors, with the camera mounted to a tripod (or focusing rail) and the remote shutter release plugged into your camera. Once you have composed the image in the viewfinder, work on shaping your light with either a constant light source (such as an LED panel) or arrange a group of wireless Canon Speedlites (diffused if possible) around your subject at various angles. In your shooting space, make sure the indoor lights are turned off to prevent color cast from common tungsten lights from occurring. Using Manual Mode, adjust your settings to achieve an even, consistent look. Adjust your aperture to the “sweet spot” for your particular lens (this can be looked up online, but is typically from around f/8 to f/11).
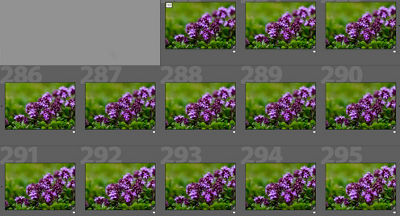
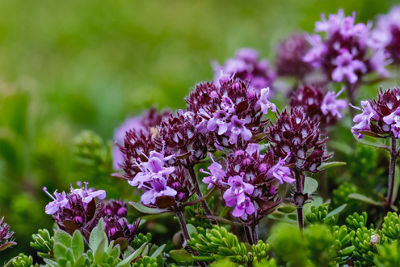
Although it is possible to create a sequence of images for focus stacking without the use of a tripod and remote shutter release, this is a difficult task that takes a lot of practice. In short, you use your lens in manual focus, and shift your focus using body movements (such as breathing or leaning techniques). In the video clip above, you can see a screen recording of the 13 frames I shot handheld, followed by the focus stacked composite output at the end. Although the position of my camera was moving inaccurately, the stacking software was able to correct for this and still produce a successful composite. There are many stacking software programs on the market, ranging from Adobe Photoshop’s built-in functionality (which I personally find doesn’t work well with macro) to fully dedicated software built just for the purpose of focus stacking. My software of choice — and again, there are other options — is called “Helicon Focus.” This final composite can be seen below.
Tripods, and Why (Sometimes) They’re Absolutely Necessary
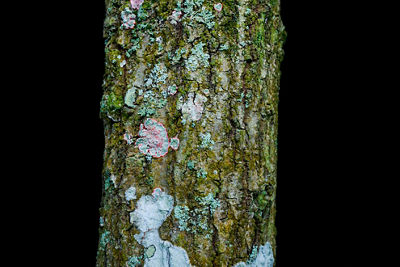
Sometimes using a tripod is essential to getting the best possible shot. A good example of this is when creating macro images of two-dimensional textures such as tree bark, rock faces, or soil. By utilizing a tripod, mechanical levels (on the tripod itself), and Canon’s built-in digital level, I was able to make sure that the plane of focus with the front element of my lens was perfectly aligned with this tree trunk. Below is a reference table that illustrates when to consider using a tripod or shoot handheld for achieving successful macro images with a deep DoF.
| If your subject is | And your goal is | Consider |
|---|---|---|
| Low to the ground | to show the environment | shooting with a tripod looking directly downwards (bird’s eye) |
| Low to the ground | to show that subject’s world | shooting handheld, getting your camera as low as possible to the ground |
| Two-dimensional & low to the ground | to show just a PART of that subject | shooting handheld, bracing your arms against the subject to provide support |
| Two-dimensional & tall (i.e. – tree trunk) | to show the whole subject with a deep DoF | shooting with a tripod, to ensure your angles align parallel to the focus plane of your subject |
Conclusion
Macro photography is a challenging genre of shooting that typically requires a large number of frames shot for very few “keepers.” By improving your DoF using the techniques discussed above, your number of successful shots can improve and show your viewers the whole scene in all its glory. Remember these tips, and you’ll be on your way to tack-sharp macro photos!
- Minimize motion blur in your image due to camera or subject movement by shooting with a fast shutter speed and using an off-camera flash.
- Beware of the tradeoffs that come with using a smaller aperture to achieve a greater DoF.
- Know when to shoot with a small aperture versus when to focus stack with a series of large aperture frames.
All Canon contributors are compensated and actual users of Canon products promoted.


