When it comes to photography, color is king. Our social media feeds and the glossy magazines we flick through are saturated in color. Yet, there will always be something special about black and white photographs.
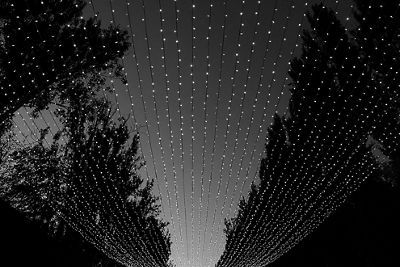
For years, the tones and form of black and white photos have had an attraction to photographers and viewers alike. One reason is that we SEE in color — black and white imagery gives us a look at subjects that we cannot normally see with the naked eye.
Perhaps it is because they seem timeless and romantic, perhaps it is because they have a moody or an arty feel. Whatever the reason, sooner or later, most photographers want to try out black and white photography.
There are two main ways to make black and white photographs with your Canon camera. One is to shoot in black and white, and the other is to shoot in color and then edit the images to be black and white.
In this guide, we are going to consider both.
GETTING STARTED
Before you start taking and making your own black and white photographs, it is worth checking out the work of masters in the field. This will give you inspiration, but it will also help you understand the different elements that make up a great black and white photograph.
Photographers such as Ansel Adams, Henri Cartier-Bresson, Diane Arbus, and Dorothea Lange are famous for their work in black and white. You can search online and find examples of their photographs. Watching black and white movies is another good source of inspiration.

Historically, photographers had to work with the forms and shapes that black and white images emphasize. Looking at images and movies from decades ago, before the popularity of color images, can give insights into ways to use monochrome imagery today.
As you look at different black and white photographs, think carefully about why they are successful. It can be helpful to ask yourself the following questions:
- What is the subject matter? Perhaps you are looking at a stormy landscape, a bold piece of architecture, or a person with a face that is full of emotion. How does the photographer's use of black and white enhance the subject matter?
- Is the photograph full of contrasts? Or is it evenly-toned? Are there a lot of shadows and highlights? How has the photographer used these elements to create a strong image?
Now that you are inspired, it's time to think about taking your own shots.
USING MONOCHROME OR COLOR TO CREATE BLACK AND WHITE PHOTOGRAPHS
A monochrome image is an image that is made up of different tones of a single color. While it can refer to color, it is commonly used to describe black and white images. The tones of a black and white photograph can range from the blackest black to the whitest white and will encompass a multitude of grays in between.
To shoot in black and white on your Canon camera, go into the menu and look for the 'Picture Style' option. This should be in the red Shooting Menu area on most EOS cameras. Set this to Monochrome. How you work with your image files, when set to the Monochrome Picture Style, depends on a few things:
- If you shoot JPEG images in-camera (Large/Fine, etc.), they’ll be permanent black and white images. Picture Style settings are “baked-in” to JPEG images and video files, so to speak, and your images will reflect the Picture Style being used.
- If you shoot RAW images and then process them with Canon’s Digital Photo Professional software, you can completely change the Picture Style with the software. Even if you originally had Monochrome set in-camera, you can revert those files to color images with no loss of quality (just pick a different Picture Style in DPP).

RAW image files are actually recorded as full color images, even if your Picture Style setting in-camera was set to Monochrome (black and white) when you took a picture. You can easily go back and forth between black and white and a full-color rendition using Canon’s Digital Photo Professional software, without any loss of quality or tonal range.
- If RAW images are taken and then processed in most third-party RAW file process software, Picture Style settings are usually ignored. Your Monochrome images, which appeared black & white on your camera’s LCD monitor, will initially appear as full color files when viewed in most 3rd party RAW software. You usually can use tools within that software to process the file as a black & white image, but this is independent of the camera’s Monochrome Picture Style.
You can also shoot in color and then change the photograph to be black and white. You can apply one of your Canon camera's creative filters to create a copy image file with a specialized, grainy black and white look, or use image editing software to convert the image afterwards. The last two options will give you both a color and a monochrome version of the shot. Many Canon EOS and PowerShot digital cameras have a Creative Filters option in their blue Playback menu area.
We'll look at using editing software later, but first we're going to consider what makes a good black and white photograph.
THINGS TO THINK ABOUT
Here are some of the main factors you need to think about when you are creating black and white photographs. Remember, even if you are shooting in color, you still need to keep these factors at the front of your mind.
Tone
Tone is the fundamental building block of black and white photography. Tone refers to the relative brightness or darkness of the different components of your image. For example, shadows are dark tones and highlights are light tones. Between these two extremes you have an array of mid-tones.
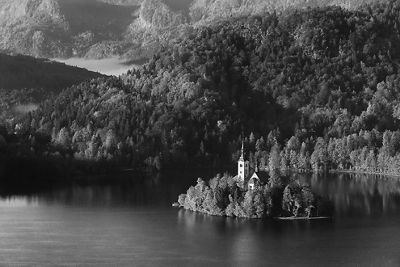
Landscape images on a sunny day typically have a huge range of tones when rendered in black and white, ranging from bright white highlights to near-black shadows, and especially with the vast numbers of different gray tones in-between.
A popular technique in color photography is the use of color contrast. Imagine how a red flower pops out against green grass. However, if the red flower and the green grass are the same tone — let's say a mid-tone, rendered as a middle gray — that contrast will be lost in a black and white photograph.

Part of transitioning from color imagery to black and white is learning to look past color, and to see how subjects will appear when rendered in black and white. This red flower jumps out at the viewer in a color image, but is almost lost, visually, in black and white (since it’s recorded as nearly the same shade of middle gray as the background grass).
Therefore, you have to think differently when shooting black and white photographs. You need to be looking for contrasts of tone instead of contrasts of color.
Next, imagine a dark green bottle sitting on a light blue piece of paper. Think about how that would appear in black and white. The bottle will be a dark grey tone, and the paper will be a light grey tone. Now you have a contrast in tone.
We are accustomed to seeing the world in color, both through our eyes and through our viewfinders. Imagining color as black and white tones can be tricky. Sometimes it helps to scrunch up your eyes, limiting the distraction of color and making distinct tones easier to see.
To use tone successfully in black and white photography, look for subjects and landscapes that have a range of light, mid, and dark tones. Look for bold contrasts and harmonious combinations.
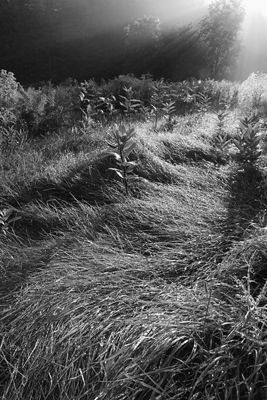
Much of the time, good black and white images rely on a range of white, gray and black tones to give the look of detail and form in your subjects. Not every scene and subject has this type of contrast, of course, but it’s these combinations of different tones in a black and white image that can produce memorable results. Taking some of your original color digital image files and converting them to black and white in the computer can give you valuable insights into what types of lighting and contrast work effectively.
But remember — like with most aspects of photography — there are no hard and fast rules. Sometimes a photograph that is composed of mid-tones alone can have a subtle and appealing mood. Think of a picture taken during a foggy morning, as one example.
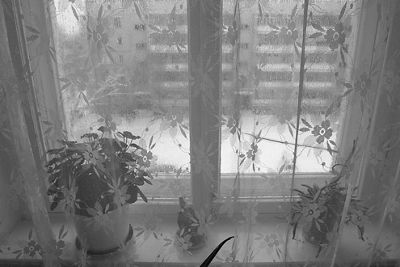
Don’t ignore the potential beauty of a black and white image with mostly subtle gray tones. This picture is a straight conversion of a color image to black and white, looking out the window of a Russian apartment on a dreary, overcast winter morning. It has an entirely different visual look than a shot taken on a sunny day, with a vibrant appearance from lots of dark and light tones.
Shadows and Highlights
The way light hits your subjects, and the shadows it produces, become a critical part of most black and white photography. When shooting in color, color alone can sometimes make the picture. A big part of transitioning to black and white is moving past color, and learning to see the impact of shadows. The presence of shadows and highlights creates more contrast. Natural and artificial lighting will determine how shadows and highlights appear in your shot.
When you are shooting outside, be aware of the position of the sun. In the morning and late afternoon, the sun is low in the sky. This creates long shadows and bright highlights, which produce striking black and white photographs. In the middle of the day, when the sun is high in the sky, landscapes can appear flat. You can also look for weather conditions that create dramatic lighting, such as sunlit buildings set against a dark and brooding sky.
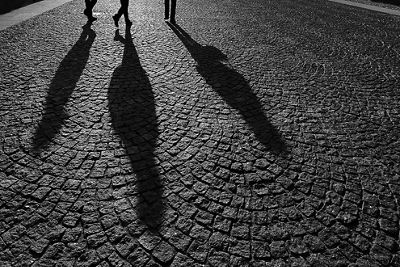
Shadows become a huge part of many black and white images, with their form often replacing the visual impact of color in a conventional digital photograph. Early or late in the day, the impact of shadows can sometimes become so great that they can actually become the primary subject in a picture.
When shooting indoors, think about how you light people and objects. Are you using natural or artificial light? How are you positioning your subject? Where does the light fall? This will define how shadows and highlights appear in your finished shot.
Low Key and High Key
Low key and high key images are all about extremes, and they are great techniques to consider for black and white photography. A high key image is flooded with light, very bright overall, and is evenly toned; they usually have an upbeat mood. To create a high key photograph, open up the aperture and allow lots of light into your lens, or turn up the brightness when you edit your photograph.
Low key images make use of dark tones and contrast; they tend to be somber and dramatic. One of the best ways to create a low key photograph is to look for dark subject matter and then use directional lighting to highlight details.

In this low-key image, most of the tones are rendered dark, deep and moody. And, the model’s skin tones stand out even more than they would in a more traditional black and white picture, with a wide range of brightness and tones.
Texture and Pattern
Texture and pattern are brilliant additions to your black and white photography toolkit. Without the distraction of color, these two elements are noticeably enhanced.
For texture, look for bold contrasts or harmonious combinations. A gnarly tree trunk stands out against a smooth background, such as a cloudless sky. In portraiture, think about the textures created by hair, skin, and fabrics.
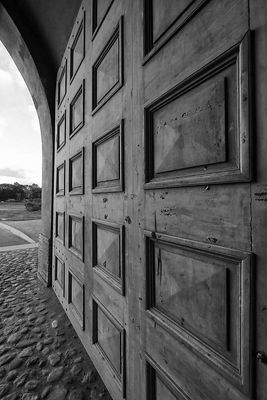
With the color removed from this digital image, you can almost feel the surfaces of the door, and the cobblestones below. Black and white emphasizes subtle contrasts of light and shadow, which can emphasize surface texture. Likewise, the visual simplicity of black and white can force a viewer’s eye toward patterns in a scene, ranging from repeating trees or telephone poles to bricks on the pavement.
For pattern, look for repetition in natural and man-made worlds. Examples would be a ploughed field with dark hollows and sunlit mounds of soil, or a line of telegraph poles in a desolate landscape. In cities, you will find patterns everywhere from roof tiles and chimney tops to rows of parked cars and grids.
EDITING PHOTOS TO BE BLACK AND WHITE
There are many ways to edit original color digital photographs to be black and white, and different editing software will have different options. Here we'll look at three of the most common.
Convert to Grayscale or Enhance to Black and White
One of the fastest ways to make a color image black and white is to convert to it to grayscale. Most editing software offers some variation of this option. In Photoshop® Elements, for example, select Image > Mode > Grayscale. You can also use the Photoshop's "enhance" feature to change your color image into black and white. And, there are numerous third-party software programs, or “plug-ins” for major image-editing programs, that specialize in black and white conversions from original color images.
Desaturate the Photograph
To use this technique, locate the saturation slider in your editing software and simply take it down to 0 to remove the color.
Use the RGB Channel Mixer
Image editing software, such as Adobe® Photoshop, often contains channel mixers that allow you to alter the red, green, and blue (RGB) channels that make up a color photograph. In the recent version of Photoshop, for example, it’s located in the IMAGE pull-down menu (Image > Adjustments > Channel Mixer…). Once there, be sure to put a check mark in the Monochrome check box — that changes the image from color to black and white. Then, experiment with the red, green and blue sliders onscreen, and see how they change the black and white tones of your photographs.
MAKING THE MOST OF TONES
Once you have created your black and white, or grayscale, photograph you can use other editing tools to lighten and darken the tones of the photograph. Look for sliders and curves that control contrast and brightness, or shadows and highlights. Experiment to see what they do. Use your own judgement to decide what looks best, or refer back to your favorite black and white photographers for inspiration.

Don’t feel limited by the initial, default settings available when you either shoot black and white images with your in-camera Picture Style settings, or use software to convert color images to black and white. Modifying contrast, applying “color filters” to lighten similar subjects in the black and white image, and so on are all available to you. You can often change a rather ordinary image into something visually stunning, if you’re willing to go beyond the basic black and white settings. Here, you can see two different renderings of an original color RAW image; the second has contrast and red tones significantly modified.
As you start to take and make black and white photographs, remember to pay attention to tone, shadows, highlights, patterns, and texture. Try selecting the monochrome Picture Style on your camera. Have a look at the results. Now shoot in color and edit your photographs to black and white. What are differences? Which do you prefer?
SUMMARY
For decades, black and white imagery has been considered a truly creative option for great photographers. Historically, of course, legendary names in photography established their greatness with superb images on black and white film. With the tools in today’s digital cameras, as well as the incredible potential we have in the digital darkroom — our computers — it’s easy for digital photographers to experience this medium. And, with its change in emphasis from color alone, becoming skilled in black and white can make you a better photographer, anytime you pick up the camera. Give it a try, and see what tools and techniques work for you.


