There’s nothing like a fresh snowfall to make a landscape truly dramatic! Snow is an inspiring photographic subject, whether you’re shooting mountain vistas, or single flakes. But it’s also a tricky subject, and many photographers find that the glowingly bright snow scene in front of their lens mysteriously turns into a depressingly gray photo after they take the shot. This article explains why that happens, and how to avoid it, for wonderful snow photos this winter season!
In-Camera Metering Explained
The biggest challenge when photographing snow lies in your camera’s metering system.
No matter how sophisticated the metering in an SLR camera is, it’s engineered to assume it’s reading “normal” subjects, of an “average” brightness. Photograph a landscape in summertime, with green grass, dark green trees, blue sky and white clouds, and the different brightness levels in the scene often average each other out. Much of the time, the meter will get these scenes absolutely correctly exposed. In simplified terms, it does this by averaging bright and dark parts of a scene, so the final exposure renders the overall brightness almost a middle shade of gray.
You may have heard the term “18% gray,” a middle shade of gray which, technically speaking, reflects 18% of the light striking it. This has been a universal reference point in photographic exposure meters for decades.
Just to clarify what that means: Middle gray is roughly the mid-tone on a gray scale — appearing to fall exactly between pure black and pure white. Subjects of this tone reflect about 18% of light (comparatively, white objects reflect nearly 100% and black objects reflect nearly 0%).
Simply put, most cameras assume that everything they photograph reflects 18% of the light, and expose accordingly. Put another way, your camera meters subjects assuming they should be photographically rendered as middle gray.
Freshly-fallen clean, white snow is obviously much lighter and more reflective than that, but the camera will automatically try to reproduce it as gray, by underexposing anywhere up to about two stops to correct for what it sees as a too-bright subject. This is exactly why many photographers will find their snow photos to be muddy and underexposed.
In-camera light metering works reasonably well with most subjects, in most lighting situations. However, there are tricky scenes that will baffle most meters — and snow is a classic example.
Metering Modes
Most cameras have more than one metering mode (though they all use the basic reflective approach described above). These modes are not always found in every camera, but here are some of the common ones found in the Canon EOS and PowerShot systems:
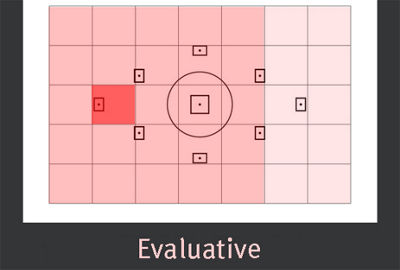
Evaluative: Metering is directly linked to, and concentrated on, the area around the active AF point, whether you’ve focused on something in the center or off-center. Light values measured at the active AF point are compared with light values measured from the metering segments across the remaining areas of the scene, and the camera's metering system attempts to provide an accurate exposure based on that comparison. This metering pattern is often effective when photographing people, but may not be quite as effective when photographing snowy landscapes depending on other elements in the scene. Note that because Evaluative Metering is linked to active AF points, focusing on a different subject may result in a very different exposure — even within the same scene. Note: In the simulated viewfinder, Evaluative mode is shown with the left-most AF point active.
Spot: The most selective metering option, it reads exposure information only from the single exposure zone in the center of the frame (approximately 3% of the total picture area).
Partial: Similar to Spot Metering, but covers a somewhat larger area, reading only the cross-shaped central five metering zones (approximately 10% of the total picture area) — some shooters think of it as a “fat spot.”
Center-weighted Average: This metering mode averages the exposure for the entire metering area, but with greater emphasis on the center metering zones. Unlike Evaluative metering, it does not compare brightness readings from different parts of the scene; it simply reads overall brightness.
Even though Evaluative metering is by far the most commonly-used system by EOS users, when using one of the EOS Creative Zone exposure modes (M, Tv, Av or P), you can select from any of the metering modes offered on your camera. If you prefer to shoot in the Basic Zone exposure modes (Full Auto, Portrait, Landscape, Close-up, Action, etc.), the default mode is usually Evaluative. This is also true in PowerShot cameras — although note that when Face Detection is turned on, any faces in the scene will have exposure priority.
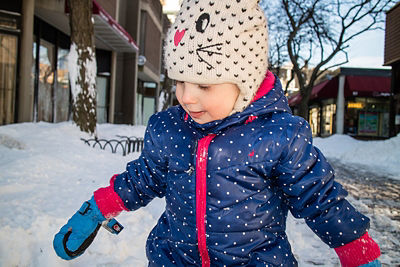
When photographing snow, any of these modes may be used effectively, depending on the overall scene. For example, if there is some contrast between the snow and the rest of the objects in the scene, then Evaluative metering may be ideal because it will emphasize the exposure for whatever you are focusing on — even if it’s off-center.
If the overall scene is evenly lit and of generally even brightness, then Center-weighted Average will work well to give a good overall exposure.
Spot and Partial metering will work well with subjects that have more extreme contrast, and/or when you want to carefully read one part of a subject or scene, and don’t want another part to ‘confuse’ the meter. Either way, they let you meter only a small part of the scene. These metering patterns are very useful when used in combination with the Auto Exposure (AE) Lock button found on most digital SLRs and R-series mirrorless cameras.
Unfortunately, even when the camera ‘accurately’ determines the correct exposure using the metering mode of your preference, with a subject like snow you will often see underexposed results. If and when this happens, however, you have a tool in your camera to deliberately lighten your pictures, and have the white snow properly rendered. That tool is Exposure Compensation.
Exposure Compensation
Exposure Compensation (EC) is the most important — and often, the easiest — way to get around your camera’s tendency to underexpose bright subjects, and overexpose dark ones. It’s also very useful for photographers who are new to Creative Zone shooting (again, the P, Tv, Av, and M settings on your Mode Dial) because it doesn’t require extensive knowledge of f-stops or shutter speeds.
Exposure Compensation (EC) lets you deliberately lighten or darken your exposures. You can vary the amount of compensation, anywhere from plus or minus 1/3 of a stop (often, a barely noticeable difference) up to plus/minus three full stops, which will significantly change most images. Using “plus” compensation adds light, so it always deliberately lightens images you’re about to take.
Keep in mind that to use Exposure Compensation (and many other features), your camera has to be in a “Creative Zone” exposure mode… that is, the P, Av, Tv, or M settings on your camera’s Mode Dial. If your camera is set to one of the full-automatic settings, you can’t change exposure, and any Compensation you may have previously dialed-in while in a Creative Zone mode will be ignored.
You can also bracket several shots in a row, with each image of a slightly different exposure using the Auto Exposure Bracket (AEB) function.
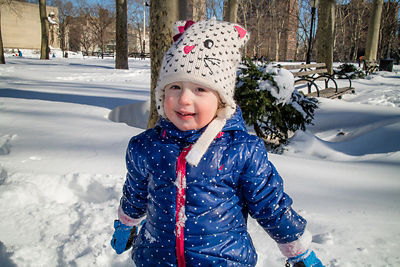
When photographing snow, you’ll want to experiment with adding more exposure, anywhere from +1/3 to +2 stops EC may work, so play around until you find what you like or try using AEB to ensure variety in exposure levels.
Another approach is to shoot RAW images, which provide additional control over exposure compensation on a computer (bonus: you'll be in the warm comfort of your home instead of out in the cold!). However, understand that even when shooting RAW images, it's still necessary to start out with an exposure that's reasonably accurate out-of-camera — and we strongly recommend using Exposure Compensation to lighten snow images whenever it’s needed.
White Balance
White Balance settings adjust the camera for the overall color character of the light source you are shooting in, so images can have a neutral rendition that properly renders colors in the scene. Many Canon EOS photographers let the camera read light and adjust this automatically, with Auto White Balance (AWB). There are also fixed, pre-set white balance settings, such as Daylight, Cloudy, Shade, and Tungsten.
Many cameras also allow shooters to take a custom White Balance, or even dial in a specific color temperature (measured in degrees Kelvin) to better match your scene, particularly for unusual or mixed-lighting scenes that are not covered by any of the preset options seen here.
Photographing snow implies you will be outside. However, differences in time of day, geographic region, and weather conditions can make a huge difference in the color temperature of your light source — even though the ‘light source’ in this case is always the sun, which means that your White Balance may need to be adjusted, and the preset for 'Daylight' may not always look the best.
The preset White Balance options are pretty accurate, but you have to remember to use the one that most closely matches your light source, and weather conditions. On sunny days with clear blue skies, it’s common to have snow seem to pick up a slight blue tint; experiment with the Cloudy or Shade WB settings to warm-up the overall color and neutralize that blue color cast.
If you shoot RAW images, you can change your White Balance while editing, regardless of your camera settings at the time of shooting. But it still makes sense to deliberately set the proper white balance, or at least one that gets your color close, before you take the picture.
Watch your Highlights!
Another reason snow poses a challenge is because any white subject photographed in reasonably bright light is at risk of losing detail with even slight overexposure. Worse yet, once a scene has overexposed highlights, there is often little that can be done in photo editing to bring that detail back. Luckily, our current line of EOS R-series and digital SLRs offers a number of functions to help photographers avoid these unfortunate ‘blown out’ highlights.
Highlight Tone Priority
One easy-to-use, and very effective feature is Highlight Tone Priority (HTP). This innovative image-control feature takes advantage of the expanded tonal range found in newer EOS cameras to achieve up to one stop more detail in bright highlight areas — without effecting the overall exposure or underexposing the rest of the scene.
HTP can only be used in the Creative Zone exposure modes (again, P, Tv, Av, M, or A-DEP on your mode dial), and once it’s turned on, the effect will automatically be applied to JPEG images and even HD video files in-camera. Two notes for RAW image shooters:
- Highlight Tone Priority will be applied (if set in-camera) to RAW images if they are processed in Canon’s Digital Photo Professional software
- HTP is usually ignored if other third-party software is used to process EOS RAW image files, even if HTP was set in-camera
Please note that when HTP is active, the highest and lowest ISO settings of your camera may not be available. Some EOS models have Highlight Tone Priority control in the Shooting Menu; on other models, it’s within the Custom Functions menu.
Histograms, and Highlight Alert
In addition to Highlight Tone Priority, you can also manage your highlights during playback: by checking image histograms, and using the optional Highlight Alert function.
A histogram is a chart that represents the distribution of pixel brightness in each image. It is visible on the rear LCD screen during Live View shooting, or during playback, and is a very useful way to evaluate exposure. Histograms are sort of mountain-shaped; the height of each peak indicates how many pixels were recorded at particular brightness levels. The most important part, however, is how the display looks side-to-side. The left side of the chart represents shadow tones in the image; the right side represents bright highlight areas, and the center represents mid-tones.
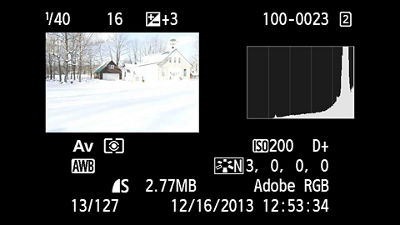
Reading a histogram properly helps photographers determine the appropriate exposure for the scene, and whether they are at risk of severe under- or overexposure. When photographing snow, two things to keep in mind as you look at a histogram when playing-back an image:
- If the scene is mostly snow, but the histogram shows a big “mountain” in the middle area of the histogram, it usually means the camera has tried to make the snow middle-gray. This is your warning to set Exposure Compensation in the “plus” direction, and take another picture… your goal is snow that appears white, not gray!
- If snow has been properly-exposed and rendered a white tone in your image, you’ll probably see a lot of information to the far right side of the histogram. As long as it’s not being cut-off by the right side of the graph, this is a good sign… the histogram info is telling you your white subject is being reproduced as a white tone in your digital image.
But, if your histogram shows portions of the graph that appear to get cut off on the far right, that means portions of your scene are severely overexposing to the point that detail may be washed out. This is a warning that your exposure should be adjusted. If you see this, try applying minus Exposure Compensation, until you see that no part of your histogram is cut off at the right edge.
Another way to check for overexposure during LCD monitor playback is with a feature called Highlight Alert. When active, this alert causes all portions of the frame on the verge of overexposing to blink on and off. This is an optional feature that can be enabled or disabled on the Playback menu of most of our EOS digital models; with EOS Digital Rebel models, it’s displayed whenever the histogram is on-screen during Playback.
Cold Weather Shooting
If you plan to shoot outdoors in the cold for an extended period of time, please consider the following precautions to ensure the safety and functionality of your camera equipment:
- Cold batteries die faster, especially in temperatures below the freezing point, so keep your batteries warm. Keep the camera relatively warm, and when possible, resist the temptation to leave it or your camera bag in cold places like the trunk of a car or unheated areas of a building for long periods of time. Also, bring spare batteries, fully-charged, and keep those warm in your pockets until ready for use
- Give your camera equipment time to acclimate when going from cold to warm temperatures. Otherwise, you risk condensation build-up, which can damage lenses as well as internal digital camera components. Gradually introduce it to warmer temperatures. One example would be to gently warm equipment using a car’s heater — not too much, however! — after cold-weather shooting, prior to bringing the gear into a heated building.
- Another trick to prevent condensation build-up when moving from cold to warm temperatures is to seal your camera in an airtight plastic bag (such as a Ziplock). Seal the camera completely inside of the bag BEFORE moving indoors, and condensation should form on the bag rather than the camera. Leave the camera inside the bag until it's had a chance to fully warm up to room temperature.
- If you anticipate mild snow or rain while shooting, waterproof your camera with plastic bags. Bring lens cloths or lint-free tissues to wipe off any moisture that might build up on the lens from melting snowflakes.
- Keep your hands warm. Invest in fingerless gloves with a fold-back mitten top, so you can access camera controls while keeping your hands as warm as possible in between shots.


