It is 4:00 am and my chirping alarm clock abruptly awakens me. Heading out to photograph the fall colors at sunrise, I notice the car temperature reading 16°F. With a sudden drop in temperature and stormy weather from the previous day, I hope the leaves haven’t turned black from the freezing temperature.
Arriving at the lake, twilight begins and the deep blue sky just starts to get light. I am anxious to discover the fall color conditions. Walking to the lake, I see a beautiful moonlit image before me of fall colors plus the delight of the first dusting of snow for the season! I’m happy that the snow dapples the mountains and doesn’t cover them completely in white.
Seeing the moon shining on the mountain peaks, I quickly set up to capture the moonlit landscape, placing some rocks in the foreground of the icy lake. I press the shutter for my first shot of the day knowing it will be my favorite and sunrise isn’t even for another half-hour. What a wonderful morning!
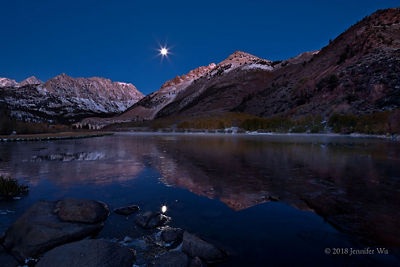
Moonburst in Eastern Sierra Nevada - Photographed one day after the full moon, with starburst effect. To create this, use an aperture setting of f/16 or higher. The small opening causes diffraction as light bends around the aperture blades causing the rays. Using f/22 you will have more rays, however I find the softening too much and prefer f/16. Photographed with the 17mm tilt-shift lens, I shifted it down to correct the landscape perspective: f/16, 30 seconds, ISO 320, TS-E 17mm f/4L, Canon EOS-1Ds Mark III.
The Moon Cycle
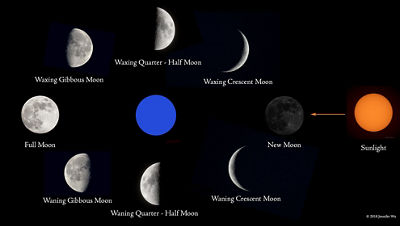
The moon rises about 50 minutes later each day and with approximately a 12-degree arc farther east. This alters the angle of the sun on the moon so it appears to change shape over a twenty-eight-day cycle, creating the phases of the moon. The full moon occurs when the entire surface as seen from Earth reflects the sun. The new moon reflects no light so we don’t see it. The gibbous moon has partial light and is the phase of the moon between half and full.
Phases of the Moon
Photographing the Moon
You can photograph just the moon or include it in a landscape photograph, adding interest to the scene. Plan your trip around the moon to include it in your landscape images. Photographing the moon at night with a landscape or at sunset can be challenging to get a good exposure to balance with the sky. Here are the days and times that make for good photographs of the moon.
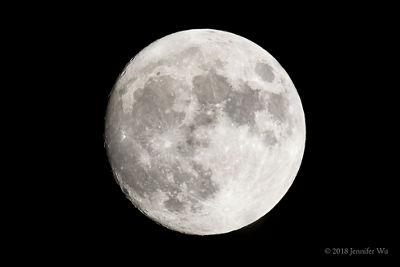
Full Moon - Photographed the night before the full moon with 97% of the moon’s surface visible. The sun directly lights the full moon without long shadows. Photographed at 400mm with a 1.4 teleconverter and cropped: f/11, 1/100 seconds, ISO 100, EF 100-400mm f/4.5-5.6L IS II USM +1.4x III, Canon EOS 5DS R.
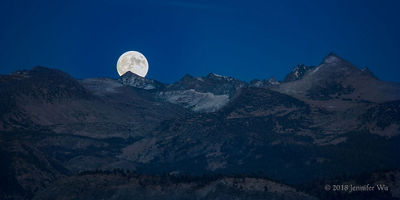
Mountain Peaks with Full Moon - I photographed the moonrise on the night before the full moon in Yosemite National Park, California with a 300mm focal length. Notice the size of the moon in the frame. I cropped the top of the image with empty blue sky since there was not much going on. Photographed at f/5.6, 1/5 seconds, ISO 100, EF 70-300mm f/4-5.6L IS USM, Canon EOS 5DS R.
When to Photograph the Full Moon
I recommend photographing one to three days before or after the full moon. For the moon and sunset, photograph to the east on the days before the full moon. Alternately, photograph it at sunrise looking west on the days after the full moon. I prefer two days before or after the full moon at twilight, especially when there are mountains or when you can’t see the horizon line. On the night of the full moon, it rises in the dark well after sunset so you won’t have the twilight to work with.
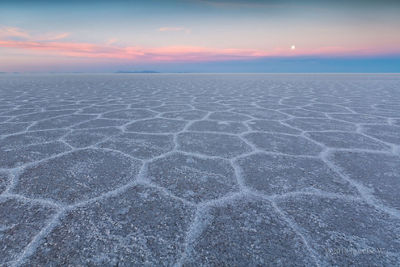
Bolivia Salt Flats with the Full Moon - Photographed one day after the full moon at twilight and a half-hour before sunrise, instead of 15 minutes (as suggested later in this article), causing the moon to be bright in the scene. Photographed with 16mm focal length, the moon appears small in the frame yet adds interest with the placement in the upper right area. Salar de Uyuni, Bolivia: f/16, 1.6 seconds, ISO 100, EF 16-35mm f/2.8L II USM, Canon EOS 5D Mark III.
When to Photograph the Half Moon
The half moon can be photographed with a black sky, during the day or at twilight. Check the resources to determine the time that will occur and plan your shoot before your trip.
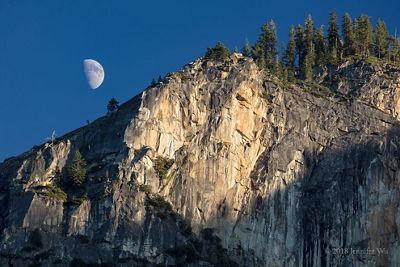
Half Moon and Cliffs - Notice the size of half moon in the frame with the 300mm focal length and how it makes the moon the dominant object in the scene. I like the pleasing symmetry of the half moon. I placed it upper left third of the frame to balance the composition. Photographed at sunset in Yosemite National Park, California. I used f/8 since it is the sharpest aperture of this particular lens: 1/30 second, ISO 100, EF 70-300mm f/4-5.6L IS USM, Canon EOS 5DS R.
When to Photograph The Crescent Moon
Photograph the crescent moon one to three days before or after the new moon. Look to the west to photograph the crescent moon at sunset on the days after the new moon. Alternately, photograph it at sunrise looking to the East on the days before the new moon.
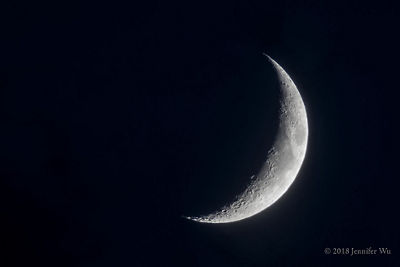
Crescent Moon with a Point-and-Shoot - You can easily photograph the moon with less expensive gear too. Photographed with the Canon G3 X PowerShot point-and-shoot camera at f/5.6, 1/8 second, ISO 125 at 220mm (600mm equivalent), cropped to the moon. My G3 X article can be found here.
Balancing Exposure with the Landscape
For any moon phase, a good time to photograph the moon to balance the exposure with the landscape is about 10 to 15 minutes before sunrise, until about 10 to 15 minutes after sunset in the contiguous United States and similar latitudes. For latitudes near the equator the time will be shorter, and in Alaska and similar latitudes it will be longer due to extended twilight time. Photographing at these times will allow for a nice exposure of the moon and landscape. At other times the moon can be washed out from overexposure and appear white without all of its detail captured in the photograph. Note that with a wide-angle lens the moon can still be appealing without detail due to how much smaller it would be in frame.
When photographing the moon in a landscape, set the exposure for the landscape. After sunset, I increase the exposure to counteract the lower light level. Once the increase in exposure is enough to cause the moon to be overexposed, I know I will no longer be able to get a good exposure for the moon and the landscape in the same shot. Once this happens, for a little while you can use a graduated neutral density filter over the sky to darken the exposure for the moon, while still allowing for a brighter exposure on the landscape underneath. Similarly nearing sunrise, once it gets bright enough I will no longer be overexposing the moon and with enough light, I will get a good exposure of the moon and landscape in one shot.
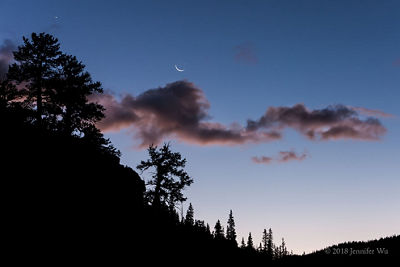
Sliver Crescent Moon - Photographing just a sliver of the moon can be challenging, check the resources for when you will have 1% visible moon surface one day before or after the new moon. It doesn’t happen every month. Atmospheric conditions can prevent seeing it until there is 3% or more visible surface. Photographed at 100mm focal length to include the landscape. Notice the size of the moon in the scene at this focal length. Sunrise at Echo Lake, Colorado: f/8, .5 seconds, ISO 100, EF 70-200mm f/2.8L IS USM, Canon EOS-1Ds Mark III.
Size of the Moon in the Frame
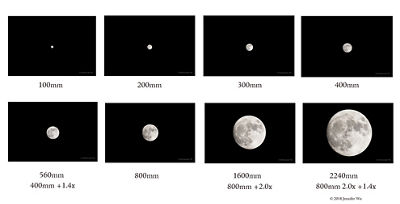
Photographed with a full-frame sensor camera. This shows what size the moon will appear in the image at different focal lengths so you can take this into consideration when making a composition of the moon in a landscape.
Exposure Settings for the Moon
For photographing the full moon, start by choosing an exposure based on the Looney f/11 rule. It states that when photographing the full moon, use f/11, ISO 100 and 1/100 second or one over your ISO if you want a different shutter speed. This is similar to the sunny f/16 rule that says to photograph on a sunny day use f/16, ISO 100 and 1/100 second or 1/the same as the ISO number or closest number. For example, at ISO 200 the shutter speed would be 1/200 second. For a half moon or crescent moon you will need much less exposure – see my exposure settings in the image captions in this article.
Be sure to have some detail in the moon. Even with a 500mm lens, in reviewing your histogram it can be very hard to see if you have a spike on the far right side. You might have just a sliver on the bright side of the moon that doesn’t have detail. To find out, turn on Highlight Alert to show “blinkies” for overexposure. Reduce exposure as needed until the Highlight Alert stops blinking to provide a good exposure.
Teleconverters
Use a teleconverter to get the moon larger in the frame. If you are using one, there will be some light loss and an increase in exposure will be needed. A teleconverter is a small lens that is mounted between your camera and main lens. It will increase the focal length of the lens. The Extender EF 1.4x III teleconverter will multiply the focal length by 1.4 and the Extender EF 2x III will double it. For example, a 400mm lens with a 1.4x teleconverter would have a 400 x 1.4 = 560mm focal length.
There will be one stop of light loss with the 1.4x and two stop loss of light with the 2x teleconverter so you will need to adjust exposure. In addition, they will decrease the minimum lens aperture by one stop with the 1.4x and 2 stops with the 2x. Check that the teleconverter is compatible and will fit with your telephoto lens. Depending on the lens and camera combination, autofocus and Image Stabilization might not work.
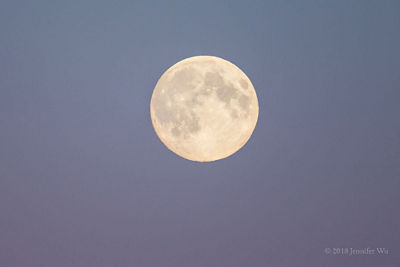
Full Moon and Twilight with Teleconverter - To get the pink band of light in the sky, I photographed just after sunset at twilight one day before the full moon, looking over the ocean without any mountains obstructing the view of the moon. Photographed at f/5.6, 1/250, ISO 320, EF 500mm f/4L IS II USM +1.4x III for 700mm actual focal length, Canon EOS-1D X.
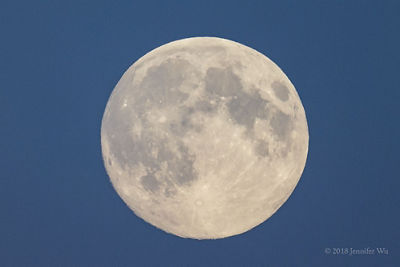
The deep blue color was photographed at twilight one day before the full moon: f/5.6, 1/800, ISO 1250, EF 500mm f/4L IS II USM +1.4x III for 700mm actual focal length, Canon EOS-1D X. For less noise, use a faster shutter speed and lower ISO.
Shutter Speed with the Moon and Stars
The shutter speed required to stop the motion in the night sky will vary depending on the focal length of the lens. The longer the focal length, the faster the shutter must be in order get a sharp image and stop the movement of the moon and stars.
When photographing the moon at night versus twilight, you can see the moon with stars with the framing from wider lenses. A crescent moon in the sky will allow you to see more stars than a full moon at night. Use the shutter speed recommendations in my Photographing the Milky Way article to keep the stars from becoming light trails instead of points of light. These shutter speed recommendations are maximum possible shutter speed for each lens, but you may need faster shutter speeds to stop the movement of the moon. I generally use a minimum of 1/125th of a second with a telephoto lens.
500 Rule
To have the stars as points of light, divide 500 by the focal length of the lens. For a crop-sensor cameras, remember to work out the effective focal length of the lens first. For APS-C cameras, multiply the focal length of the lens times by 1.6 for the effective focal length. The result is a good starting point for maximum shutter speed that can still stop most of the apparent motion from stars. The 500 rule gives a general idea of the shutter speed, however remember that due to the Earth’s rotation, stars close to the North Star will move slower while stars farther away from the North Star will move faster.
For example: using a 24mm lens, divide 500 seconds by 24 to give you 20.8 seconds, or a 20 second exposure.
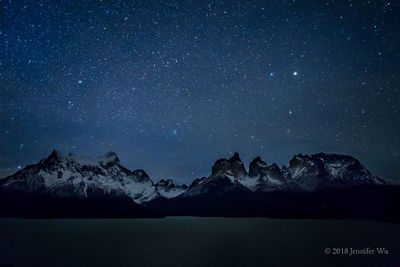
Patagonia Moonlit Landscape - The crescent moon set prior to taking this image. The moonlight remaining after the moonset and the reflections from the white snow allowed for the mountains to be dimly lit in soft indirect light. Photographed with 24mm focal length in Torres del Paine National Park, Chile at f/2.8, 25 seconds, ISO 6400, EF 24-70mm f/2.8L USM, Canon EOS 5D Mark III.
Focusing
When photographing the moon or the stars, focus on the moon with autofocus. I use a single focusing point in the center of the frame. Next, turn off the autofocus on the lens. You can put a piece of tape on the focusing ring to keep focus locked throughout the night. If you have any difficulties due to clouds, you can use Live View. Press the magnify button to maximum view and manually focus with a loupe. Turn off autofocus.
Once focused, you are set for the night unless you change focal length on a zoom lens or accidentally move the focusing ring. After taking your shot, review your image on the camera’s LCD screen and press the magnify button to view at 100%. You can set up some Canon EOS cameras (7D Mark II and all current full frame models as of June 2018) to magnify at 100% by selecting the blue menu under “Magnification” and then select “Actual size” from the drop-down menu. Check to see that the moon is sharp and use a faster shutter speed if it looks blurry from motion. Use a remote controller (also called an electronic cable release) or self-timer to prevent motion blur when you press the shutter button.
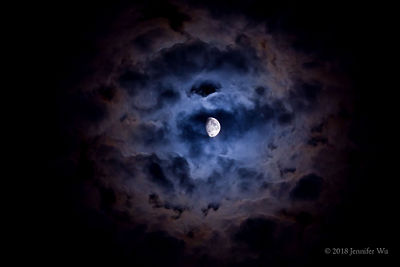
Half Moon and Clouds - Photographed near the half moon with hexagonal ice crystals diffracting moonlight on the clouds, creating the 22-degree ring of color. I find that photographing the moon with a halo in the clouds works best around the half moon. On the full moon, the exposure must be reduced to see detail in the moon, making the clouds too dark to see. Alabama Hills, California. 1/5 second, f/5.0, ISO 400, EF 100–400mm f/4.5-5.6L IS USM at 200mm, Canon EOS 5D Mark II.
Soft Focus Moon
Thin cloud cover can make the moon look soft and not as sharp. Look for a halo around the moon, which can be beautiful. Like photographing the stars, sometimes the moon is bright and other times dimmer. There can be a yellowish color to the moon, especially when near the horizon. This color shift is due to air pollution; dust storms and atmospheric conditions and can also reduce sharpness of the moon in the photograph.
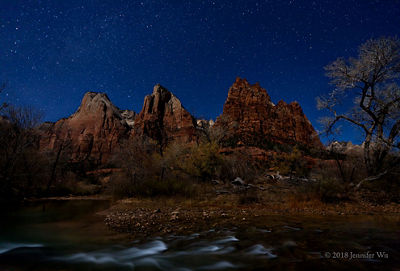
Zion by Moonlight - The Moon provides direct light opposite the mountains. The quarter moonlight provided enough light to fully light the landscape but still remain dark enough to see plenty of stars. I walked through the river to an island to get the foreground prominent in the scene. My friend photographing with me offered to catch my gear should I fall into the river. I called out, “Never mind saving me!” Using a wide-angle focal length of 16mm allows for plenty of depth of field to get the foreground in proper focus as well as the stars. Photographed in Zion National Park, UT at f/2.8, 30 seconds, ISO 1600, EF 16-35mm f/2.8L II USM, Canon EOS-1Ds Mark III.
Moonlit Landscapes
As the moon rises from the east and sets to the west, observe the landscape in all directions. Locate the moon in the sky by using the resources listed. Photograph in the opposite direction of the moon for strongly lit landscapes, to the east and west, and sidelight for interesting shadows with softer light. To create silhouettes of mountains, trees or boulders, photograph at twilight or at night on a new moon or when the moon is below the horizon.
Direct moonlight on the landscape is a harsh light source. When the moon is low in the sky and near the horizon, it casts interesting long shadows and has lower light levels. When the moon is high in the sky, there is a stronger light that makes for shorter shadows. The shadows are similar to what we see in sunlight at sunset versus at noon, except without the warm sunset color.
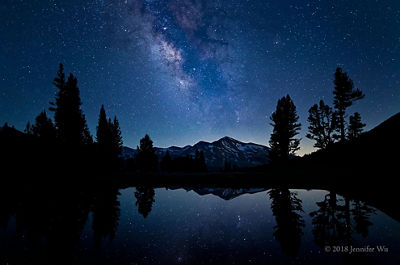
Sidelight in Yosemite - The moon is off to the right side of the frame, providing soft sidelight to the mountains in Yosemite National Park, California. Photographed at f/1.4, 20 seconds, ISO 2000, EF 24mm f/1.4L II USM, Canon EOS 5D Mark II.
Resources
Find out the phase of the moon and its location in the sky by using Time and Date, StarWalk 2 App, PhotoPills App, The Photographer’s Ephemeris, Naval Oceanography Portal, or the free planetarium software. Instructions are on the websites of these resources to determine when the moon will rise or set on the mountains or horizon.
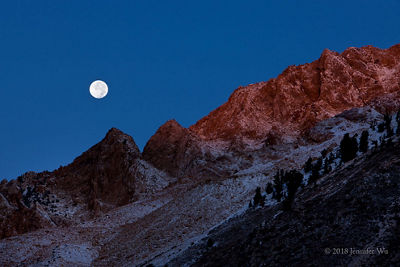
Eastern Sierra Moon - Photographed two days before the full moon at sunrise: f/11, 1/25 second, ISO 100, EF 70-200mm f/2.8L IS USM at 170 mm, Canon EOS-1Ds Mark III.
Once in a Blue Moon
The full moon goes by many names. The Harvest Moon is around the fall harvest on the full moon closest to the autumnal equinox. The Blue Moon is when there are two full moons in the same month. This occurs every 2.7 years and the second one is called Blue. The Supermoon is when the moon is closest to Earth.
Wishing you clear skies and stunning images of the moon. Happy Photographing!


