
You've scrimped and you've saved. You've researched and planned. And the time has finally come: VACATION. Unfortunately, vacation doesn't happen often enough, and when it does come, you want to have nice photos. Sure, you'll take plenty of pictures with your phone and maybe even a point and shoot, but is there room on your vacation for your more professional gear? Well, I say “yes.” As a somewhat "expert" vacationer to Hawaii, there's no way I could imagine traveling there without packing at least some of my gear. This article will outline some of the considerations I make in deciding what gear to pack, when to bring my camera with me on outings, and knowing how to not completely ruin a trip for my kids with an overabundance of pictures.
First, let's talk about packing. While it might seem perfectly reasonable for you to pack every single piece of your photography gear, there's this thing called clothes that we typically also need to pack. I know. Such a drag. So, some decisions have to be made on what gear is essential when you're going beyond the point and shoot.
Essentials:
- Camera (I know, obvious. But you'll need it.)
- Batteries for your camera
- Battery charger
- Multiple memory cards. I bring a lot of cards because I don't always bring my laptop so I don't have a way to empty my cards. I like 8-16 GB cards for my Canon 5D Mark III camera. While I do have some larger GB cards, I prefer the 8 or 16GB cards because if I end up with a corrupted card and have it all on one gigantic card, well, tadaa!, I just lost all my vacation photos. That would suck.
- At least one lens
- Camera bag or backpack
Extras:
- More lenses
- Tripod
- Flash
- Underwater housing
- Garden gnomes
Everyone shoots differently, so what your “extras” list will look like might vary greatly from mine. Although, I would imagine that most people pack at least one garden gnome, don't you think? I rarely use my flash, so it’s not an essential. But if I deem I have room and want to take some sunrise or sunset landscape photos, I pack my tripod, but before I even consider my tripod, I think about what lenses I want to bring.
For some people, picking just one lens might be all they need, but maybe I’m not your normal person. I adore different lenses for different looks, so for me, I have to decide what I think I’ll be photographing and will I need different lenses for these situations. I typically find that I am going to want my three favorite lenses: my EF 16-35mm f/2.8L II USM, EF 24-70mm 2.8L II USM, and EF 135mm f/2L USM.. Is this too many lenses? This is a decision you need to make for yourself. On a day trip, I am comfortable carrying my camera around my neck and a backpack with my other lenses. I can also just decide to pack one lens with me if I'm not feeling like carrying a heavy pack. But the thought of missing the type of shot I want because I don't have the right lens just isn't something I can bear.
PACKING YOUR GEAR FOR THE PLANE
The biggest issue is getting all this gear to my destination when flying. I don't want to check my gear, since I don't trust that my checked bag isn't going to be thrown around and stomped on by gorillas. This means I have to carry it on. I have a hard carry-on case that will hold my underwater housing and a couple of lenses with adjustable pads and Velcro so I can protect my precious cargo. I also use a backpack to carry my camera and one lens that I can use on the plane if desired. This backpack also carries my wallet and any essentials I need from my purse. Because my backpack will fit under my seat, I am able to bring both bags on with me: one under the seat and one in the overhead compartment. I pack my tripod in with my checked luggage. I'll admit, it's a bit of a pain, but for me, it's entirely worth it.
When we go to Hawaii, it's all about the beach and being in the water. I want my photos to reflect not only the beauty of Hawaii, but the feeling that we have when we are there. To capture that feeling, I find that my EF 16-35 f/2.8L USM lens is essential. I often get down as low as I can, and shoot at 16mm, so that I can get nice and close to my happy kids. This allows me to get up close and personal with my kids while also being able to showcase the environment. Even if you don't shoot as wide as 16mm, many other lenses would be appropriate for wide-angle shots. Shooting focal lengths of 24mm or 35mm give a great wide-angle feel without as much distortion.
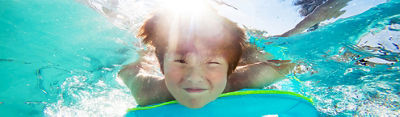
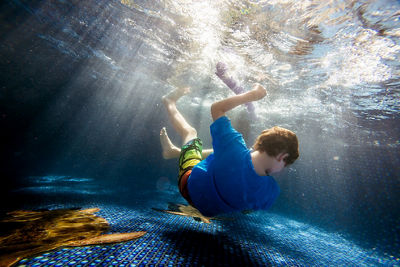
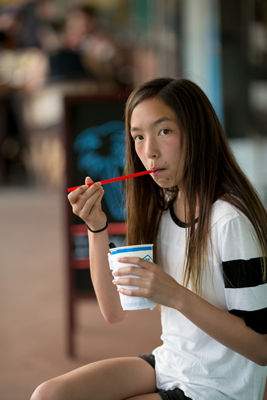
For many of my photos of the kids in the water, I have my camera in underwater housing. This allows me to not worry about my gear getting wet. Is it difficult to cart all this stuff to the beach? Yes, sort of. But again, it's worth it to me. I don't bring it on every outing. My kids have a limit on how much they want me behind the camera, and I don't want to worry about my stuff being stolen while I frolic in the water. On my last Hawaiian vacation, I chose to bring my camera to the beach three times during a 10 day trip. This means I didn't capture every single awesome moment that happened on this trip with my professional gear. But, that's okay. I had a gorgeous time with my kids, made memories, and have some amazing photos of some of the fun things that happened. The pictures shown in this article highlight our last two trips to Hawaii. Gosh, I love that place. You probably want to hire me to come photograph your next Hawaiian vacation, right? RIGHT???
CAPTURE ACTION!
One surefire way to get forced smiles and uncooperative, grumpy kids when you're ready to get some vacation shots is to ask them to stand and pose for you. While sometimes I will make them do this because one of my jobs as a mother is to annoy and frustrate them, the posed pictures are rarely all that awesome.
Case in point:
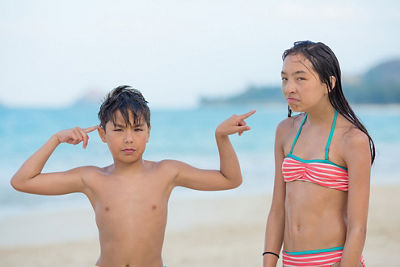
I'm not gonna lie, I actually like that semi-posed picture because for better or for worse, those are my kids, and I love seeing their personalities shine through. When I look back at my favorite pictures of my childhood, it is rarely the photo where I am standing still and doing my say-cheese-for-the-camera face. It's the ones that show my personality, which was sometimes grumpy, but often silly and laughing. So, I suppose it's no surprise that my favorite shots of my kids are often the ones where I just capture them doing what they are doing. For more information on capturing action shots and getting happy shots, check out my article From Grumps To Grins.
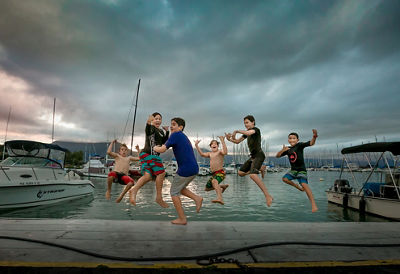
You'll see that many of my photos below capture movement and action. While some people's trips to Hawaii might be mellow moments of hanging out quietly on the beach, that's not how we roll, and I want my vacation photos to show our action.
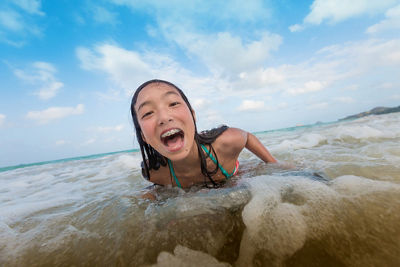
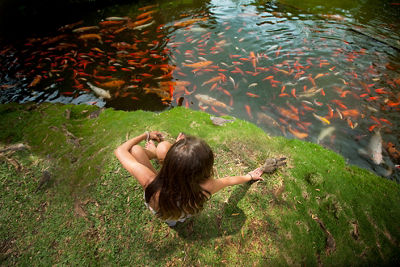
GET DOWN LOW
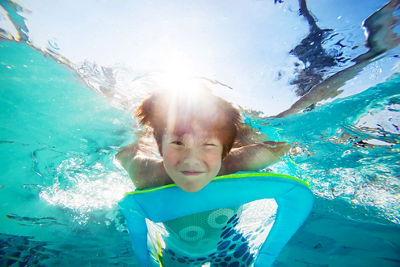
This image of my daughter was caught by getting down low low low. My shutter was set to fire continuously, so just by pressing and holding the shutter down, I could take multiple photos. As she came toward me, I started firing off continuous shots, while holding my camera down close to the ground. Yes, I had my camera in underwater housing, although just having it in water resistant gear would have worked. And if you're really brave you could just rely on your uncanny ability to predict the unpredictability of waves and just hold your unprotected camera an inch from oncoming waves. I mean, whatever. It's just your expensive camera... (sure hope my sarcasm is being noted here).
Anyway, to get this perspective in the photo below, I did not have my camera to my eye. I chose to set my camera to automatically select focus. Because the background is just sky and water, the camera is going to look for areas of higher contrast to grab focus, which means, it'll focus on my daughter. By having a smaller f-stop, I increase my depth of field, increasing my chances of getting her in focus. When she got so close to me that she was going to hit my camera, I quickly lifted my camera up. This was the best of the series. My happy girl.
In the image below, I literally was chasing after her holding my camera down by my feet, close to the ground, and away from my face, firing continuous shots.
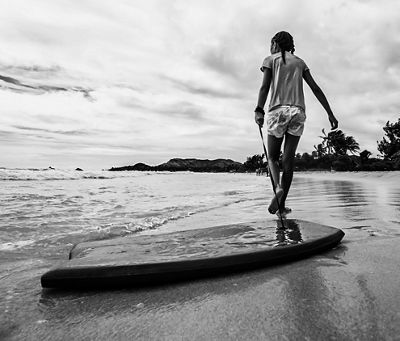
SHOOT FROM ABOVE
In crowded areas, it can be a challenge to isolate your family from the bustle of tourists. In cases like this, it can help to shoot from above, again, using a wide-angle lens. Sometimes I'll hold the camera to my eye to focus on my subject, but when I feel like I need to get even more environment, I'll hold the camera above my head. To focus, I already described one way to do that by choosing to set my camera to automatically select focus. Another method is to preselect your focal point and then just practice a lot to aim your camera in the correct place while holding it above you. This can be a lot of trial and error. I'm okay with that because I can fire off a lot of shots and know that I'll get some that are in focus. I really only need one. Biggest problem for me is getting my own feet in the shot. Another great way to photograph high or low angles is to turn the Live View function on and compose your picture by looking at the screen.
DON'T BE AFRAID OF SHOOTING IN FULL SUN
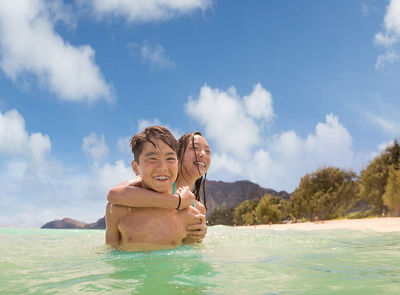
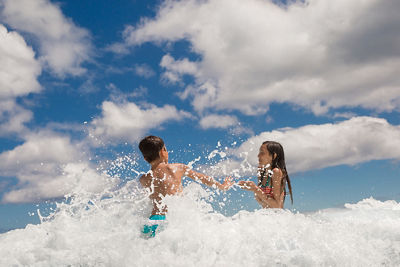
The next photo is probably my favorite image from our vacation. I love how they look like they are playing amidst the clouds. It was taken in the middle of the day, around 11am, in full sun.
Some photographers shy away from photographing in the middle of the day since the harsh sun can create unflattering shadows. But I love shooting at this time of day because it's so easy to capture the beautiful blue of the sky. The trick to getting the sky beautiful and blue, and not blown out and white, is to be sure that your subjects are illuminated by the sun. The sun should be behind or to the side of you. When my subject is facing the sun, and my goal is to capture both my subject and a blue sky, I typically choose evaluative metering for my metering mode and then adjust my settings so that my meter is set to zero or +1/3.
Here's another example of shooting in full sun with the sun illuminating my lovely daughter. It was about an hour before sunset, and the sun was directly on her. Why do I love it? Well, because I love her. But beyond that, the sun provided a beautiful golden light that lit not only her, but the background behind her. This allowed for gorgeous color on her face, and on the background and sky as well. Had she been backlit, with the sun behind her, instead of in front of her, the sky would have been blown (white) if I had exposed for her. While there's nothing wrong with this, I adore color and love to use color in my photos to convey the happiness that Hawaii brings. Again, I got down low, at her eye level, which I think helps pull you into the photo. I wanted to be sure that it would be obvious where we were, so I chose to have my aperture at f/6.3, thus increasing my depth of field, to ensure that the hotel would be enough in focus to make it recognizable. You'll see that in a lot of my photos, my aperture is set somewhere between 5 and 6.3. I think this helps a lot in environmental vacation shots.
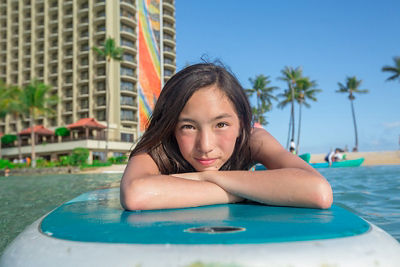
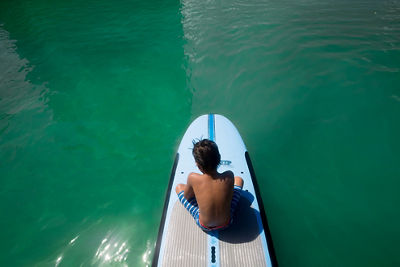
In this image of my studly paddleboarder wearing red dirt-stained board shorts, he is sidelit by the sun, which again allows for me to expose both for him and the sky and have both be colorful and vibrant. If the sun were behind him, and I exposed for him, the sky would have been blown (white).

STEP BACK AND ZOOM IN
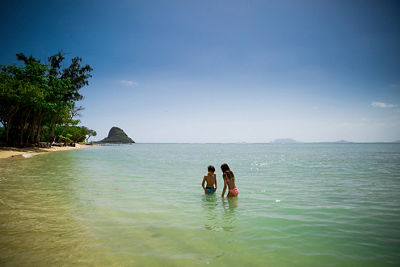
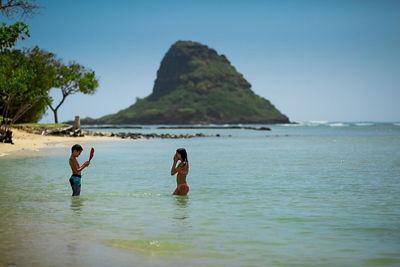
I realize that a majority of my photos thus far have been shot with the same EF 16-35mm f/2.8L USM lens. That's because it's my favorite of all my lenses and thus, the lens I feel most comfortable with. But there's a reason I bring the other lenses, and the below image is a perfect example of it. We found a lovely isolated beach near Chinaman's Hat (Mokoli'i Island). Photographing the kids with the iconic Chinaman's Hat behind them with a wide-angle lens doesn't really emphasize the island. It gets lost in the background.
See what I mean? Hello there, widdlebiddle island.
By using my EF 135mm f/2.0L USM lens, I was able to compress and magnify the background so that it appears much larger. They aren't standing any closer to the island. Isn't that cool? If you've ever been less than wowed at your ability to capture the magnificence of a mountain range in the background, grab a long lens, and see what a difference it makes!
Long lenses are also great for blurring out the background. The group of people sitting at tables behind my daughter became just pretty blurry colors because of using a long lens. Long lenses can work great to help isolate your subject from a busy background.
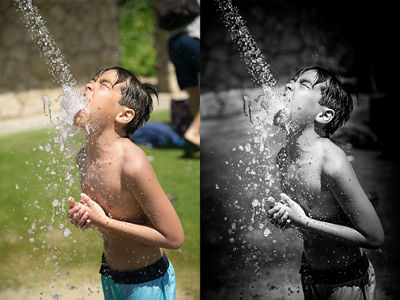
I converted this shower image of my son to black and white for several reasons, but one nice advantage of doing so was how easy it was to just darken the upper right hand corner and remove the person who was walking back there. The focus stays on him, and I didn't have to do any fancy cloning in Photoshop®. Shot with my EF 24-70 f/2.8L USM lens, I chose to zoom in to 70mm to help compress and blur the background.
Whatever destination you choose for your vacation, regardless of what gear you pack, remember this: just jump in and have FUN!
All Canon contributors are compensated and actual users of Canon products promoted.

Thanks for signing up!
The application has encountered an unknown error. Please try again in a few minutes!
By clicking Sign Up, you are opting to receive promotional, educational, e-commerce and product registration emails from Canon USA. You can update your preferences or unsubscribe at anytime.