
Turn Your Aspirations into a Treasured Keepsake
If you love memory keeping, photography, junk journaling, or mindful manifestation, this creative project turns your aspirations into an interactive keepsake you can enjoy crafting all year long.
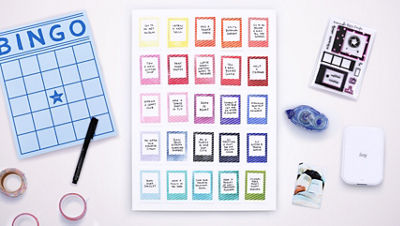
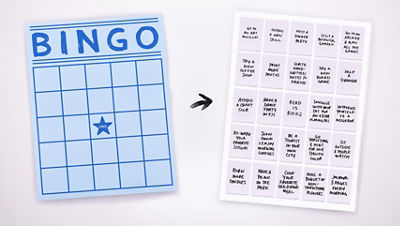
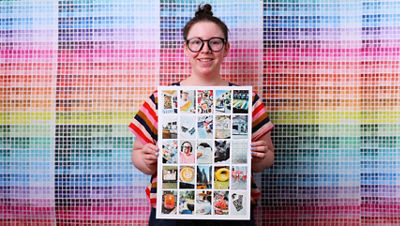
Skip your usual boring lists of aspirational goals and create a Vision Board Bingo Card instead! With this project, you’ll craft a visual grid of your aspirations that you can fill in all year long with real-life photos as your manifestations become reality.

Each square in your bingo board starts with an aspiration. When completed, you replace the written version with a photo of the moment you achieved your aspiration. By the end of the year, you’ll have a one-of-a-kind keepsake filled with your greatest memories.
This project works beautifully with the Canon IVY 2 Mini Photo Printer, which prints small peel-and-stick photos that are the perfect size for your vision board bingo card.
Let’s walk through exactly what this vision board bingo card is, and how you can make your own.
What Is a Vision Board Bingo Card?
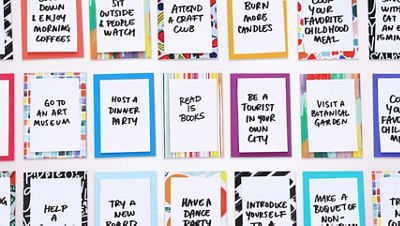
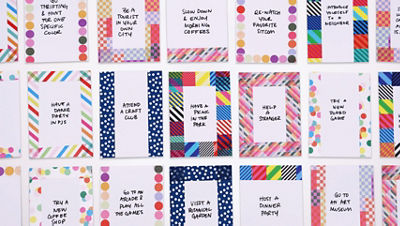
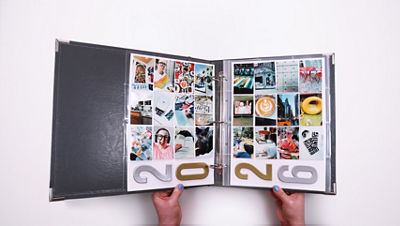
A Vision Board Bingo Card is a grid of aspirations you hope to accomplish in the coming year, laid out in the traditional 5 row x 5 column bingo card structure.
Each square on your bingo board represents something you want to do, experience, or accomplish—things like:
- Try a new coffee shop
- Host a dinner party
- Read 15 books
- Try a new board game
- Cook your favorite childhood meal
As you complete each aspiration, you replace the written card with a photo of yourself completing the activity.
Once you’re done, the board becomes a visual record of your experiences—a keepsake you can cherish for years to come.
Supplies You’ll Need
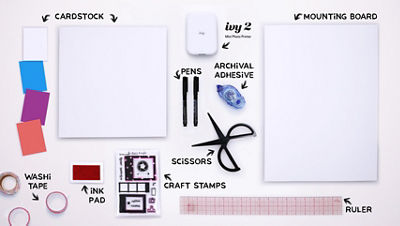
Basic Supplies
- White cardstock
- Pen or marker
- Archival adhesive
- Mounting board or large sheet of cardstock
- Canon IVY 2 Mini Photo Printer
- Scissors
- Ruler
Optional Decorative Supplies
- Washi tape
- Decorative cardstock—color or patterned paper
- Craft stamps—like Captured and Pattern Play from The Paper Curator
- Ink pads
Step 1: Select Your Aspirations
The first thing you’ll need to create a vision board are some aspirations. For this project, you’ll need 25 different aspirations.

Try mixing these types of aspirations
Personal Achievements
- Read 15 books
- Try pilates
Experiences
- Visit a new museum
- Take a sunrise walk
Creative Endeavors
- Journal 3 pages a day
- Print more photos
‼️Pro Tip: Your aspirations can be big or small. There’s no right way to manifest your dream life! If you want this to be a shorter-term project though, it will help you to include aspirations that are simple and achievable.
Step 2: Prepare Your Cards
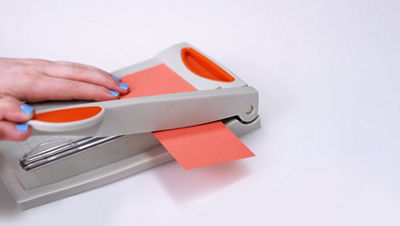
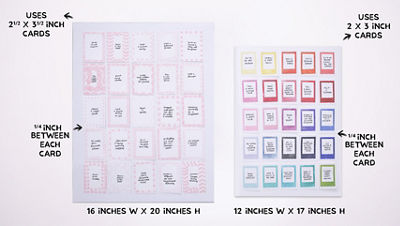
The main element of your bingo board will be your aspiration cards. To create these you’ll need 25 pieces of paper cut to a small card size. Depending on whether you’d like to decorate them or not, these can be sized:
- 2 x 3 inches - card will be completely replaced by photographs; or
- 2 1/2 x 3 1/2 inches - a 1/4” border will be visible once your project is completed
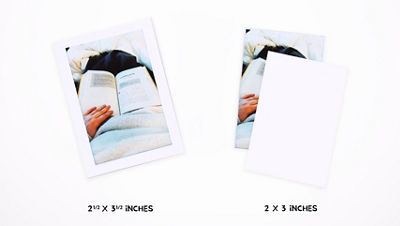
This size you select for your cards determines whether or not they will be completely covered by photos, or whether you will have a decorative border surrounding your photos once the project is complete. This is because the mini photo prints produced by the Canon IVY 2 Mini Photo Printer are 2 x 3 inches themselves so they will either replace or supplement your cards as you complete your vision board bingo card.
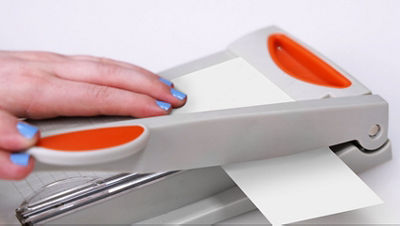
Once you’ve selected the size card you’d like to use for your project, trim down your white cardstock paper into 25 individual pieces of paper sized to either 2x3 inches, or 21/2 x 31/2 inches as determined above.
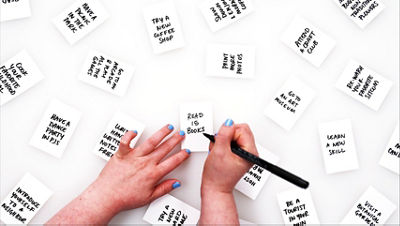
Step 3: Write Down Your Aspirations
With your 25 pieces of cardstock cut to size, it’s time to write down your aspirations. You can do this with any marker or pen you have on hand. Simply jot down one aspiration per card until you have 25 cards total.
Step 4: Decorate Your Cards
Now it’s time to turn your aspiration cards into something special.
This step is optional, but if you’d like to make your aspiration cards uniquely your style, try decorating your 25 cards using the methods below, which can make your in progress bingo board feel more lively and colorful.
Option 1: Use Stamps
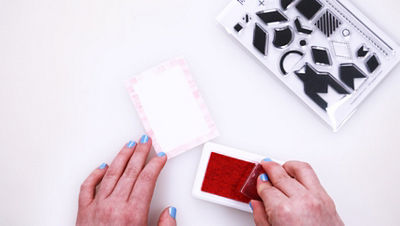
Stamp the design of your choosing around the edges of the card using your favorite ink color, or a range of ink colors.
Try this:
- Create a frame for your written aspirations using craft stamps
- Use all one color ink for a uniform look
- Mix and match ink colors for a rainbow feel
- Play with scale by choosing similar patterned elements in varying sizes
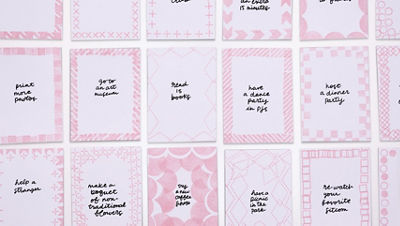
The cards above are created using the Pattern Play Stamp Set from The Paper Curator.
When choosing craft stamps for your project, it’s important to select or create stamped designs that leave a blank space in the center for your aspiration text.
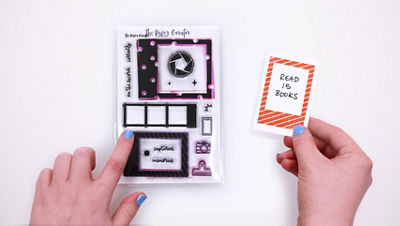
Frame-style stamps work especially well for this project. Consider something like the frame in this Captured Stamp Set from The Paper Curator which is sized perfectly for the 2 x 3 inch card size.
Option 2: Use Decorative Paper
Cut patterned or colorful scrapbook paper to 2 1/2 x 3 1/2 inches in size. When you mount your 2 x 3 inch aspiration cards, you’ll be left with a decorative ¼ inch border around all four sides.
Try this:
- Mix and match different patterns
- Use coordinating colors
- Create a themed board using papers featuring a specific color palette or subject matter
Using colorful decorative papers for this project adds extra personality and visual interest to your bingo board from the time you make it to after it’s filled up with photos.
Option 3: Add Washi Tape Borders
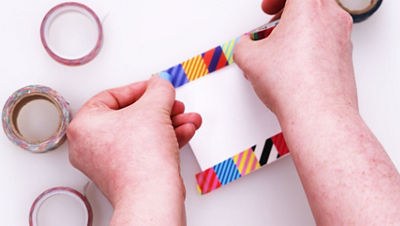
Washi tape is one of the easiest decorative options.
Try this:
- Add washi tape along all four edges for a full frame
- Add washi tape along two opposite edges for a simpler border
This technique is a great way to use up your washi tape stash, and with so many different designs available, there’s surely one to fit your style.
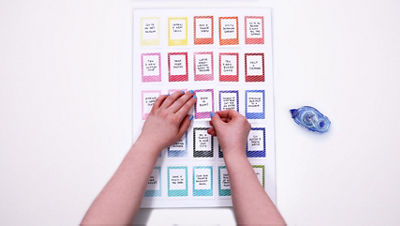
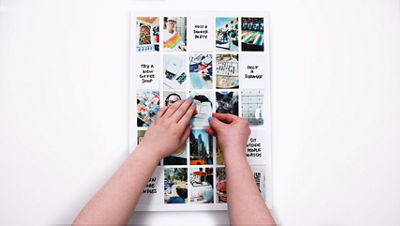
Step 5: Arrange Your Bingo Grid
Once your 25 aspiration cards are ready, it’s time to build your bingo board.
Arrange the cards into a grid of 5 rows × 5 columns like a typical bingo board.
There’s no rules to how you structure your bingo board. Just go with whatever feels best to you, moving around each of your aspirations until the layout feels balanced in color, design, or aspiration type. Arranging by color or design is especially relevant if you’re using the more decorative card options like stamping, patterned paper, or washi tape.
Step 6: Mount Your Bingo Board
When it comes to displaying your board, there are two options for mounting the cards:
Option 1: Permanent Mounted Board
Align each of your 25 cards into a grid of 5 rows and 5 columns.
Recommended Mounting Board Sizes:
- 12 × 17 inches (for standard 2 × 3 inch cards)
- 16 × 20 inches (for larger, 2 1/1 x 3 1/2 inch decorative cards)
‼️Pro Tip: Using a ruler can help you nail consistent spacing for this project. Leaving 1/4 inch between each card keeps your finished project clean and visually balanced.
Mount each card onto your mounting board using archival adhesive so that your keepsake stays intact for years to come.
Option 2: Magnetic Display (Flexible Option)

If you want something more flexible, use magnetic clips to place your aspiration cards onto a magnetic surface— a magnet board or fridge work well for this.
This option allows you to:
- Rearrange goals
- Swap cards easily
- Move the board during the year
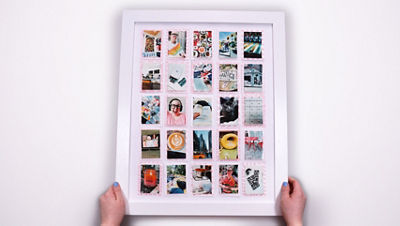
Once you’re finished with your aspirations, you can start fresh with a new set of aspirations and turn your finished board into a framed art piece or scrapbook page.
Step 7: Replace Aspirations with Photos
Now comes the most rewarding part.
As you accomplish each aspiration, take a photo of the moment and follow these steps to replace each aspiration with a photo.
7a. Print your photo using the Canon IVY 2 Mini Photo Printer. Print right from your phone’s camera roll using the Mini Print app.

7b. Peel off the sticker backing from your printed photo.
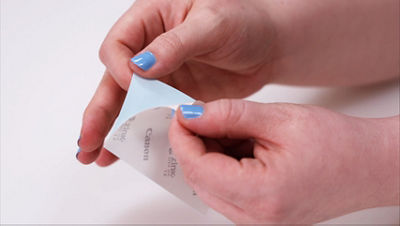
7c. Mount the photo directly over the aspiration card it corresponds with.
Over time, your bingo board will fill up with memories which is the most rewarding part of this whole project.
Enjoying Your Vision Board Keepsake
By the end of the year, your bingo board becomes a sentimental keepsake.
Instead of a forgotten list of aspirations, you’ll have a visual memento of your year—a collection of photos representing the moments that mattered most to you.
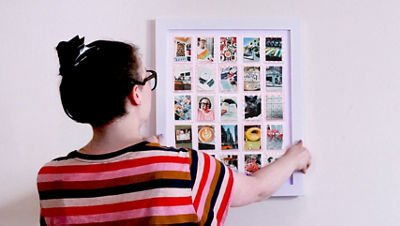
Consider preserving your finished board by:
- Framing it as wall art
- Storing it in an archival box
- Adding it to a scrapbook album
- Incorporating it into a junk journal spread
It becomes a snapshot of your life, your accomplishments, and the experiences you chose to prioritize.
And that’s what makes this project such a powerful memory-keeping tool.
Final Thought
Creating a vision board doesn’t have to feel rigid or overwhelming.
Turning your aspirations into an interactive bingo card adds playfulness, reflection, and storytelling to the process—and by the end, you’ll have a keepsake filled with real memories to look back on.
Crafting a vision board bingo card is a creative memory-keeping project that will help you manifest your future, live in the present, and cherish the little moments throughout your year so get started today! There’s no time like the present.
Thanks for signing up!
The application has encountered an unknown error. Please try again in a few minutes!
By clicking Sign Up, you are opting to receive promotional, educational, e-commerce and product registration emails from Canon USA. You can update your preferences or unsubscribe at anytime.