
Live Switcher Mobile: How to get started!
What is the Live Switcher Mobile app?
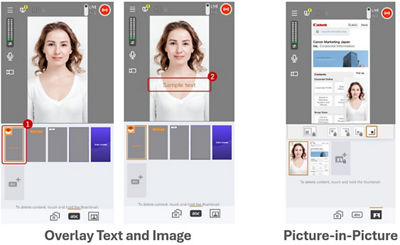
Live Switcher Mobile is an iOS app that lets you stream wirelessly to various platforms live —including Facebook Live, YouTube Live, and Twitch LiveFootnote1—supporting the use of up to three compatible cameras, and displaying Picture-in-Picture (PiP), text overlays, and more.
What Devices are Compatible?
Compatible devices for Live Switcher Mobile:
- iPhone / iPad — can be used as the main switcher device
- Supported OS:
- iOS 17/18/26
- iPadOS 17/18/26
- Canon has confirmed operation on the following devices:
- iPhone 13 / 14 / 15 / 16 / 17
- iPad (9th generation)
- iPad Air (M3)
- Note: Operation is not guaranteed on all devices.
- Supported OS:
- Additional iPhone / iPad devices — can be used as extra camera angles or for screen sharing
- Canon EOS R50 V camera— can be used as a compatible Canon camera input
Why Pair It with EOS R50 V?
By using Live Switcher Mobile together with a Canon interchangeable lens camera, you can create a livestream setup that is both flexible and high quality. You get the freedom of wireless multi-camera streaming, along with the strong image quality, wide lens choices, and reliable autofocus performance of the EOS system.
The EOS R50 V camera includes Canon’s advanced autofocus technology. It can clearly detect and follow your subject, helping keep it in focus even when it moves quickly. For professionals and serious creators who stream product tutorials, demos, interviews, and presentations, this autofocus helps make live production easy, reliable, and professional.
Live Switcher Mobile Requirements
Before using Live Switcher Mobile, please make sure that you have all the necessary devices ready and charged, and that you have completed the setup for the online account needed for the streaming platform destination you wish to stream to. Live Switcher Mobile is available for free with limited features, or you can upgrade to a paid version with full features. The paid version is available with a one month free trial for new subscribersFootnote2.
Requirements
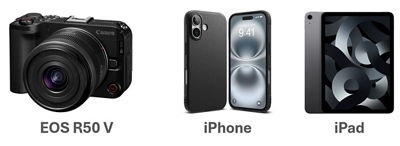
- Compatible Devices: iPhone, iPad, EOS R50 V
- Internet Network: Wi-Fi, mobile data, or hotspotFootnote3
- Streaming Account: Facebook, YouTube, Twitch Other platforms require an RTMP connection
1) How to Install the Live Switcher Mobile App
To use Live Switcher Mobile, install the app on the iOS device that you will use as the “switcher” device, and also on any additional iOS device that you may use as a camera. By doing so, you can control the live stream from one device, and use another device as a remote camera or for screen sharing.
Note: If you are using the EOS R50 V camera, install the Live Switcher Mobile app only on the iOS device you will use as the “switcher” device. Follow the steps below on each device you will use to control the live stream.
To install the Live Switcher Mobile app:
- Open the App Store on your iOS device.
- Tap the “Search” magnifying glass icon.
Note: The position of the search icon varies by device and by iOS version. - Type “Live Switcher Mobile” into the search bar.
- Tap “Search.”
- Tap the blue “Get” or “Install” button next to the Live Switcher Mobile icon.
2) How to Launch the Switcher App
When you launch the Live Switcher Mobile app on your device for the first time, you will be prompted to follow the steps below.
- To launch the Live Switcher Mobile app on the iOS device used as the switcher:
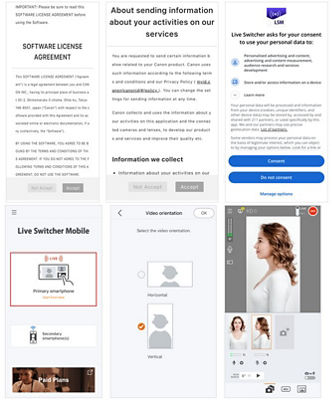
- You will see the “SOFTWARE LICENSE AGREEMENT”; scroll to the bottom and tap the “Accept” button if you agree.
- Likewise, you will see “About sending information about your activities on our services”; scroll to the bottom and tap the “Accept” button if you agree.
- Live Switcher Mobile will ask for your consent to use your personal data; please choose whether to agree or not.
- Tap the “Primary smartphone” button.
- Select the orientation of the main smartphone video.
- To launch the Live Switcher Mobile app on the iOS device used as a secondary device(s):
- The process is the same as the above instructions until the confirmation of consent.
- When prompted with the choice of primary or secondary smartphone, tap the “Secondary smartphone(s)” button.
- If you wish to use the camera, select “Share camera”. If you wish to mirror the screen, select “Share screen”.
- Select the video orientation of the secondary smartphone.
3) Live Switcher Mobile App Interface Overview
After selecting the screen orientation of the device you’ll use as the switcher, the main interface will display.
- Camera Screen
Select up to three video inputs
(EOS R50V cameras, iOS cameras or screens)
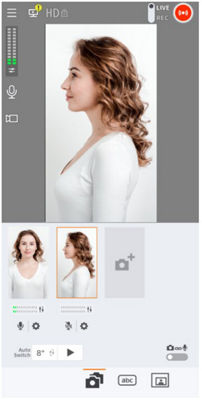
- Tools
Access and control in-app features.
- Live Setting
Select and connect to streaming platforms for your live stream, etc.

Note: For a comprehensive overview of the Live Switcher Mobile app, please refer to the following URL: https://lsm.ssw.imaging-saas.canon/lsm/en/lsm.html
4) How to Connect Camera Angles & Screenshare
You can start live streaming with just one camera. But adding multiple EOS R50 V cameras or using iOS devices as extra cameras or screen-sharing sources can make your livestream dynamic and professional. To use an iOS device as a remote camera or for screen sharing, you must first install the Live Switcher Mobile app on that device and connect it to the same Wi-Fi network or hotspot as the main “switcher” device.
To connect remote devices:
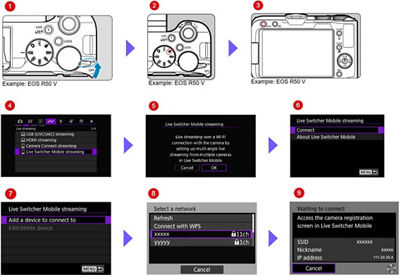
- EOS R50V
- Turn the camera’s Power switch to “ON”.
- Rotate to your desired shooting mode on the Mode dial.
- Press the “MENU Button” on the camera body.
- Proceed to the Purple “Communication functions” menu tab, and select “Live Switcher Mobile streaming.”
- Press the “OK” button on the screen.
- Select the “Connect” menu option.
- Select the “Add a device to connect to” menu on the screen.
- Select the same network name that the “Switcher” smartphone is connected to.
- Once the screen states “Waiting to connect,” proceed to the settings of Live Switcher Mobile app.
To connect remote devices:
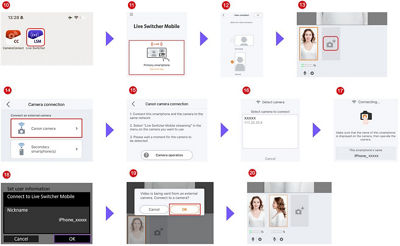
- Launch Live Switcher Mobile on your smartphone.
- Select the “Primary smartphone” button.
- Choose your video orientation, whether to stream vertically or horizontally and then tap the “OK” button.
- Tap the “Add Camera” button. (📷+)
- Tap the “Canon Camera” button.
- A connection screen will appear, please wait a few moments while the camera is detected.
- When your camera appears in the list of available cameras, tap it to connect.
- Confirm that your smartphone name is displayed on screen.
- On your Canon Camera, confirm that the smartphone name displayed on Live Switcher Mobile is the same as your smartphone, and press the “OK” button.
- A message saying “Connect to a camera?” will be displayed on Live Switcher Mobile, so press the “OK” button.
- Confirm that the camera feed is displayed on Live Switcher Mobile. The setup for sending the camera feed to Live Switcher Mobile is now complete.
Note: The following guidance will provide illustrated instructions for the connection process. Please see Step 1: “Send the camera feed to the main smartphone.” https://lsm.ssw.imaging-saas.canon/lsm/en/guideline.html
- iOS device
Check that both the main and secondary devices are connected to the same Wi-Fi network.
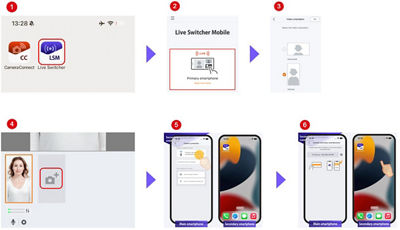
<First, follow the steps for the main iOS device>- Launch Live Switcher Mobile.
- Tap the “Primary smartphone” button.
- Choose the video orientation, whether to stream vertically or horizontally and tap the “OK” button.
- Tap the “Add Camera” button. (📷+)
- Tap the “Secondary smartphone(s)” button.
- The IP address of the connected Wi-Fi network will be displayed on the main smartphone’s screen, please stay on this screen.
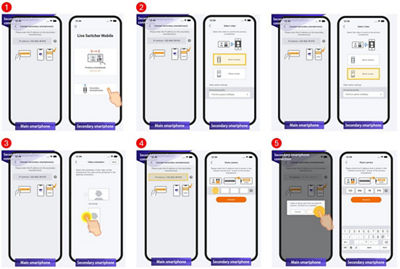
Next, follow the steps for the secondary iOS device that you want to use as a camera or for screen sharing.
- Launch Live Switcher Mobile.
- Tap the “Secondary smartphone(s)” button.
- If you wish to use the camera, select “Share camera.”
- If you wish to mirror the screen, select “Share screen.”
- Select the video orientation of the secondary smartphone video.
- Enter the IP address from the main smartphone screen into the secondary smartphone, and tap the “Connect.”
- Tap the “OK” on the main smartphone.
Note: The following guidance will provide a video explanation for the connection process. Please see Step 3: “Sending camera footage from the secondary smartphone to the main smartphone”. https://lsm.ssw.imaging-saas.canon/lsm/en/guideline.html
5) How to Connect Streaming Platforms
The next step is to connect your streaming accounts to your Live Switcher Mobile app. Please follow the below steps to connect to platforms such as Facebook Live, YouTube Live, and Twitch.
Note: Live Switcher Mobile is not a live streaming platform. Please note that it is different from apps like Instagram and TikTok, where you can start streaming as soon as you press the Stream button.
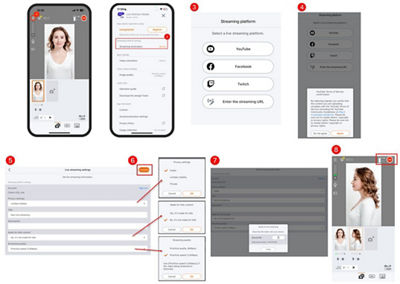
To connect your streaming platform(s):
<In case of YouTube, Facebook or Twitch>
- On your smartphone, tap the navigation menu button with three horizontal lines.
- Select the “Streaming platform settings” button.
- Select your Streaming platform.
- If you agree, allow your information to be shared with the Live Switcher Mobile app.
- Log in to your desired platform with your account information.
- Enter the video stream settings such as quality, privacy settings and viewing permissions and then tap “Complete.”
- When setup is completed, and your stream is ready, a URL will be displayed for sharing.
- Close the sharing window and tap the red “streaming” icon in the upper right corner.
Note: The following guidance provides a video for the connection process. Please see Step 6: “Setting up a streaming platform and starting live streaming”. https://lsm.ssw.imaging-saas.canon/lsm/en/guideline.html
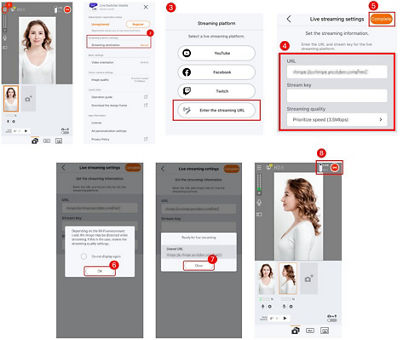
<In case of any RTMP provider>
You can live stream to any RTMP provider, not just YouTube, Facebook and Twitch. Configure the RTMP server information for your streaming destination.
Note: When streaming to platforms other than YouTube, Facebook and Twitch, comments will not be displayed.
- Tap the navigation menu button.
- Select the streaming platform.
- Select “Enter streaming URL.”
- Enter the URL and stream key provided by each live streaming platform.
- When you're done, tap “Change.”
- Check the displayed content and tap the “OK” button.
- After tapping the “Close” button, you can start streaming.
- Tap the red “streaming” icon in the upper right corner.
Note: The following guidance will provide a video explanation for the connection process. Please see Step 4: “Manually specify an RTMP server as the streaming platform and start streaming.” https://lsm.ssw.imaging-saas.canon/lsm/en/advanced-guide.html
6) How to Switch from Live Streaming to Recording
You can choose to either livestream or record video of your non-broadcasted stream and store it on your iOS device to be used as a switcher. Simply select using the “LIVE/REC” switch.
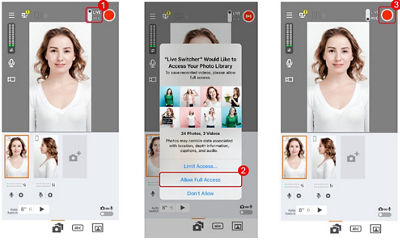
To start the recording:
- Select “REC” from the "LIVE/REC" switch.
- When an alert is displayed on your smartphone, “Allow Full Access” to your “Photo Library.”
- Tap the red “Streaming” icon to start recording. The video on the streaming screen will be recorded. Tap the “Streaming” icon once more to stop recording.
Note: The recording feature records the image on the streaming screen. Images from the secondary smartphone that are not displayed on the streaming screen cannot be recorded.
When the “LIVE/REC” switch is set to “REC,” you can record video but you cannot live stream.
When the “LIVE/REC” switch is set to “LIVE,” you can live stream but not record. To record during live streaming, use the recording feature of the streaming platform you are using.
Note: The following guidance will provide a video explanation for the connection process. Please see Step 5: “Recording video you plan to stream” https://lsm.ssw.imaging-saas.canon/lsm/en/advanced-guide.html
CONCLUSION
With “Live Switcher Mobile,” you can stream live content from multiple angles easily, without the need for complex setups. By combining wireless connectivity, simple operation, and an all-in-one tool with a Canon EOS R50 V camera, creators can flexibly deliver content with a professional finish. Whether you’re streaming tutorials, interviews, presentations, worship services, or outdoor events, Live Switcher Mobile lets you maintain a connection with your audience while exercising creative freedom in more locations. If you have questions or need step-by-step support, please visit the Live Switcher Mobile guide page on imaging-saas site (link directly below). So go ahead—start streaming now and enjoy the content you can create with Live Switcher Mobile!
- You will need an account to a livestreaming platform. Creating an account is free. Subject to third party service providers terms and conditions.
- If you’d like to know the differences between the paid and free versions, please refer to the comparison page: https://lsm.ssw.imaging-saas.canon/lsm/en/pricing.html
- When connecting devices to Live Switcher Mobile, only wireless connections are supported. Wired connections are not supported.
Thanks for signing up!
The application has encountered an unknown error. Please try again in a few minutes!
By clicking Sign Up, you are opting to receive promotional, educational, e-commerce and product registration emails from Canon USA. You can update your preferences or unsubscribe at anytime.