This article was originally published on March 28, 2011 and has been updated to include current product information.
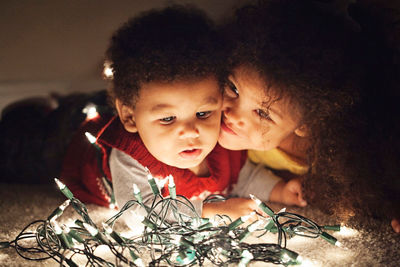
December is a great month to photograph bright, festive decorations. One of the most eye-catching decorations is also the most challenging: holiday lights. There are many different tricks and techniques detailed below to capture the beguiling colors, glitters, and twinkles – pick the one(s) that work best for you and your equipment, and make the most of this beautiful holiday season!
Cameras for Capturing Holiday Lights:
Really, almost any digital camera can be used for photographing holiday lights. The primary things you'll want are a camera with the ability to change shooting/exposure modes, and to make settings like raising or lowering ISOs. The ability to alter White Balance (the overall color "tint" of your pictures) can be very handy when you're photographing not only subjects lit by artificial lights, but the lights themselves.
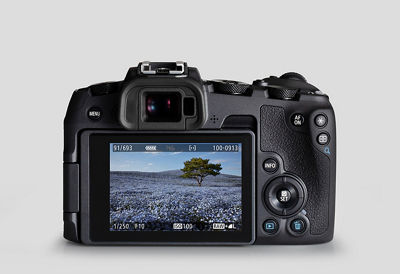
Some recently-introduced cameras now have Electronic Viewfinders (sometimes abbreviated "EVF"), and these have some nice advantages when it comes to photos or video recording in dimly-lit situations. First, they can often raise the overall brightness of the scene you're looking at, making it easier to see and compose your images, even when most of the scene is in deep shadow. And secondly, you can see a good approximation of the brightness and the color rendition you'll likely get in your pictures, right in the EVF, before you take the first picture. And if you decide to change a setting like White Balance, you'll see the shift in color immediately after you've set it. So while photographers have taken great pictures of holiday lights for decades using traditional "optical" viewfinders, you'll likely find your success rate goes up a bit if you use a modern mirrorless camera, or a compact digital camera which has an electronic viewfinder.
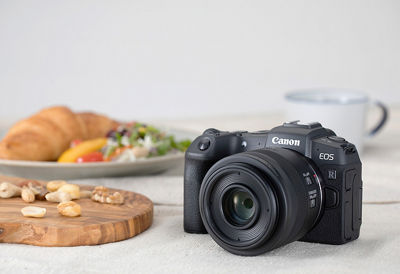
While the intent of this article is not to act as a sales pitch, the recently-introduced Canon EOS R camera is outstanding in both viewing and focusing in low-light situations, arguably among the best cameras in the industry for this type of work. If you enjoy this type of low-light work, the next time you're camera shopping, you should take a look at this full-frame, mirrorless Canon EOS camera.
Exposure Tricks:
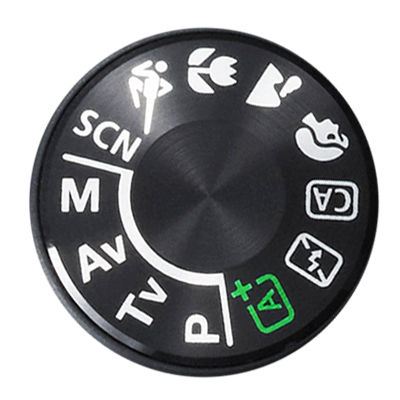
Most of the time, when photographing subjects such as lights or candles, you are in a low-light setting. However, this is one time when a flash is generally not a good option; so the first tip is to turn off your built-in flash. Your choice of Exposure Mode, on the Mode Dial, plays a major part in this. Any of the following shooting modes will prevent the built-in flash from automatically trying to pop-up and fire every time you press the shutter button half-way down in a low-light situation:
Any "Creative Zone" mode – P, Tv, Av, or M
Flash Off mode (available on most recent EOS cameras)
Creative Auto (CA) modes, which allow manually turning Flash Firing to "Off"
Sports Mode
Hand-held Night Scene mode, available in many recent Canon EOS models, as a separate icon on Mode Dial, or within the SCN (Special Scene Modes) settings.
There are three basic exposure tools to capture a great image: ISO, Shutter Speed, and Aperture – various combinations of these settings will optimize your camera to best capture this tricky low-light/bright-subject shot:
- High ISO: ISO is a setting that tells your camera how sensitive it should be to light. Higher settings such as 800, 1000, 1600, 3200, etc. result in greater sensitivity – the higher the ISO, the less light you need to record an image. However, the trade-off is that higher ISOs show greater levels of 'noise' (that pastel speckling visible throughout some images, most noticeable in shadow and mid-tone areas).
However, recent digital SLRs have amazing low-light performance, due in part to improvements in CMOS sensors, as well as an important Custom Function offered in most of our recent EOS cameras: High ISO Noise Reduction. Critical users shooting in a "Creative Zone" exposure mode (P, Tv, Av, or M) can go into either the camera's Custom Function or Shooting Menu, and vary the level of High ISO Noise Reduction to suit their preferences. The factory-default "Standard" level, however, is usually fine for most purposes.
Something to keep in mind: Interchangeable lens cameras, with larger imaging sensors, show much lower noise levels at the same ISO than digital point-and-shoots, so be cautious when choosing your exposure settings. With a compact digital camera like a Canon PowerShot, you may want to opt for an ISO no higher than 400 in combination with a slow shutter speed and/or wide aperture. However, with an EOS camera, you can use an ISO of 1600, 3200 or even as high as ISO 25,600 with some EOS models, and feel confident that you will get a very usable image. - Long Exposures: Almost without exception, holiday lights will be at their best when the surrounding environment is dark, whether indoors, or outdoors at dusk or at night. And, these lights are almost always fairly modest in their output as well. So we're usually talking low-light situations any time we're photographing holiday lights. Modern digital SLRs can handle most low-light situations easily, but there are a few things you can do to insure great pictures in these situations:
- Shoot at higher ISO settings. EOS cameras set to "Auto" ISO will naturally tend to pick higher ISOs in these types of low-light scenes. But if you're working in the P, Tv, Av, or M shooting modes, you can set ISO yourself to settings like 1600, 3200, or even higher if the holiday lights you're shooting and their surroundings are not super-bright. You'll be shooting at faster shutter speeds, all else being equal, if you use higher ISOs – and that means less chance of blurs from any motion blur.
- Use a tripod. A tripod is the best way to stabilize your camera. If you don't have a tripod, see if you can lean the camera against a nearby lamp post, park bench, or other solid surface. If there is nothing to brace the camera on, make sure you are holding it as steadily as possible: Hold the camera firmly with both hands. Use your optical viewfinder (rather than the LCD) if you have one, so you can rest the camera against your face. Keep your elbows bent, and tucked into your chest, and keep your knees slightly bent for improved balance; basically, you want to turn yourself into a tripod.
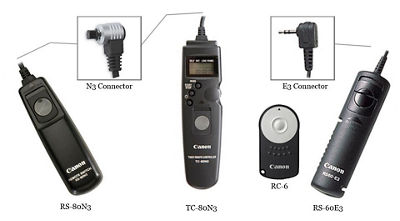
Even if your camera is on a tripod, consider using a cable release. If you don't have one, use the camera's self-timer function (because with very slow exposure times, even the slight movement of pushing the shutter button can sometimes result in a blurry image). Many recent EOS and PowerShot cameras have built-in Wi-Fi® capability. If your camera offers this, you can connect to a compatible smartphone or tablet with Canon's free Camera Connect App installed, and then use your device as a remote controller to fire your camera. - If your lens has Image Stabilization, use it. Many of Canon's EF, RF, and EF-S lenses, as well as select PowerShot models, have built-in Optical Image Stabilization. Image Stabilization effectively reduces blur caused by camera movement, and allows sharper pictures at slower shutter speeds when you're hand-holding the camera.
- Use a wide-angle lens. Wider focal lengths, such as 16mm, 18mm, 24mm, etc. are much more 'forgiving,' showing little-to-no blur from camera movement, even at slower shutter speeds. Consider stepping closer to those lights, and zooming the lens to a wider focal length, to minimize blurs and camera shake.
Understand that motion blur is caused by two 'culprits': subject movement and camera/photographer movement. Subject movement should not be an issue in this case (because lights are static). However, camera or photographer movement may still be a problem. Any of the steps above will help curtail it.
- Pick the right Exposure Mode: We've already mentioned above that by selecting the right shooting mode, you can prevent the camera's built-in flash from trying to fire in a situation where most of the time, you don't want it to. Experienced and critical shooters may move right into Manual exposure mode, for full control. But there are plenty of other options for easy, automatic operation that will still optimize the camera for low-light conditions.
- Flash Off mode:
This was mentioned above – totally automatic exposure, like the full-auto "green zone" setting, but with the built-in flash prevented from firing.

- "P" (Program) mode:
Similar to the full-auto "green zone" shooting mode, but with three important benefits: Built-in flash won't try to fire each time you press the shutter button halfway (unlike Flash Off mode, you can get it to fire by pressing the camera's Flash On button); you have full access to all Menu settings and Custom Functions; and (perhaps most important), you can deliberately lighten/darken your images with Exposure Compensation.

- Hand-held Night Scene mode:
Also mentioned above, since it prevents the built-in flash from firing. Not to be confused with the much more common "Night Portrait" or "Night Scene" mode which has been on EOS cameras for years; this one was introduced in 2012 on EOS models like the EOS Rebel T4i (EOS 650D). Instead of trying to shoot one single long exposure in dim light, it takes four quick shots in a row, at faster shutter speeds, and then digitally blends them into one finished image, with normal brightness and significantly lower noise levels than typical high-ISO shots would have.

- Av (Aperture-priority mode):
A familiar mode for many experienced SLR users. Still has the ease of auto exposure, but now gives the shooter control of several important functions: lens aperture (easy to pre-set a wide lens opening, and know the camera will leave it there); ISO; and (if needed) Exposure Compensation, to deliberately lighten or darken a shot. And, full access to all Menu settings and Custom Functions.

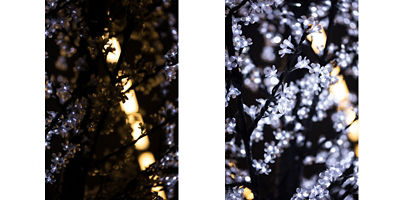
Slow shutter speeds, such as 1/30th or 1/15th of a second, are something we usually try to avoid in low-light shooting, to prevent blurs from camera shake. But there is one instance where you may need to use slower shutter speeds with holiday lights: certain types of new, energy-efficient type lights may cycle on and off rapidly, and you may take a picture and it appears that some or even all the lights are off! It's nothing you did – it's just the lights "blinking" on and off, at somewhere around 60 times per second, and at a fast shutter speed, you caught some or all during an "off" part of their blinking cycle. The answer: use a slower shutter speed. The easiest way to do this is go to the P or Av mode, and set a lower ISO (drop it down to half or one-quarter of where you started from), and try again. Setting a smaller lens aperture (higher f-number) in Av mode accomplishes the same slower shutter speed, too.
White Balance:
Setting your camera's White Balance is a great way to control the look and feel of your image. There are several options to choose from, even on basic point-and-shoots. Essentially, White Balance settings will tell the camera which light source it should capture as white, or neutral light - and every other light source within that shot will be adjusted accordingly.
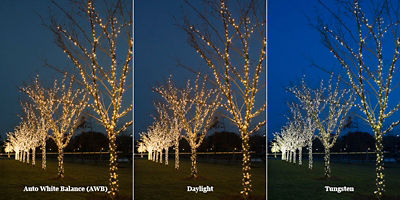
Auto White Balance (AWB) is the starting point for most users, and in the fully-automatic shooting modes is usually the only choice available. It will try to balance the color of white light in the scene, but will often deliberately leave a trace of warm tones (yellow or amber colors) to preserve a sense of "atmosphere" with traditional tungsten-type holiday lights. AWB is often the best place to begin for newer types of holiday lights, like energy-efficient LED and compact-fluorescent lights we're beginning to see more and more of.
If the overall colors aren't coming out as you want, consider one of the other White Balance options your camera provides. With most cameras, you'll need to be in a "Creative Zone" shooting mode, like P, Tv, or Av to set these. Common options include: Daylight, Shade, Cloudy, Tunsgten/Indoor, Fluorescent, Flash, etc. Here are some suggested settings that may work especially well for indoor or outdoor holiday light displays:
- Tungsten: Many holiday lights use incandescent bulbs, similar to the traditional tungsten household bulbs most of us grew up with. Auto White Balance can render these a bit too "warm" in color sometimes. Setting your camera's white balance to Tungsten (the 'lightbulb' icon) will render white lights to appear white or slightly warm-white. If you are photographing outdoors at dusk, Tungsten WB may cause the sky may appear as an exaggerated deep blue (the Auto White Balance setting may have a very similar result, in this case). Colored holiday lights, if they're tungsten-based, will appear close to the color you saw with your eyes.
- Daylight: Setting your camera to a daylight white balance (the 'sun' icon) will result in lights that appear to glow amber, orange, or yellow. If you are shooting outside at dusk, the sky will appear as a more neutral blue.
- Dialing in Color Temperature – "K" White Balance: Mid-range and upper-end digital SLRs will also let you 'dial in' a custom Color Temperature (measured in Kelvin) that can very precisely control the overall "tint" of any tungsten-type light or daylight-type light source - given a little trial and error in some cases. When shooting traditional tungsten-type holiday lights, if you find AWB and even the Tungsten WB settings still leave you with a yellow- or orange-colored cast, try setting the camera to the "K" WB setting, and then in the shooting Menu, adjust it to a value like 3000, 2800, or lower. In the shooting Menu, you can also find the camera's White Balance Shift, adding controlled amounts of green, blue, amber, or magenta to your image until you get the look you want – this can be added to any WB option you've set. Both of these options require you to shoot in a "Creative Zone" shooting mode (P, Tv, Av, or M).
Special Effects:
Holiday lights offer great inspiration for photographic experimenting. Here are some fun things to try:
- Soft Focus: Create a glowing, dreamy look with soft focus effects. Canon actually has a specialty lens with this effect built in – the EF 135mm f/2.8 Softfocus lens, which has a choice of 2 diffusion levels.
Alternately, some filter manufacturers offer various fog, smoke, and diffusion filters that can screw onto the front of your lens. These are actually useful for landscape and portrait photography, which may make them a good investment. They can be used with any lens that accepts screw-in filters via threads on the front of the lens. (Note that many of the compact Canon PowerShot models cannot accept filters, and those that can often require a separate, optional filter adapter.)
In a pinch, you can create the effect without spending any money: try breathing on the front of your lens and taking the picture while the glass is still fogged up. You have to be quick, and the effect is not consistent/controllable – but it's free, and you can get some interesting effects! - Motion Blur/Streaks: This is where you might embrace the motion blur caused by slow shutter speeds. Deliberately moving the camera during a long exposure will result in unique streaks of light and color that make for very creative images. Experiment with different kinds of movement: panning, tilting, spinning, zooming in and out – each movement will create a variety of patterns and shapes.
Whatever special effect you prefer, you can probably create or enhance it in the computer, with any number of third-party image editing programs or filter plug-ins. Poke around online, and you're sure to find a ton of options.
There are many ways to use today's digital cameras for stunning images of holiday decorations. Remember that every time you take pictures is an opportunity to learn more about your equipment, to experiment, and to have fun – think of it as a small gift to yourself this holiday season!
All Canon contributors are compensated and actual users of Canon products promoted.


