
The Canon EOS R5 C is an incredible, professional hybrid camera, combining the incredible photo specs of the Canon EOS R5 series camera with the premium video features of a Canon Cinema EOS line camera. It has become a go-to option for hybrid wildlife shooters like myself who want the best stills and video quality when I’m in the field.
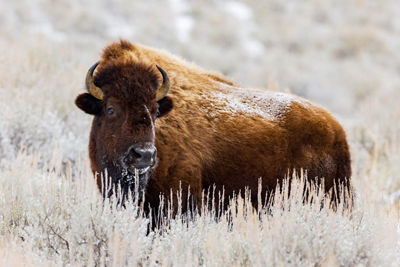
But with those ample photo and video features the EOS R5 C camera offers comes the important settings to learn and master, that are tailored towards wildlife shooting. So, I took the difficulty out of the discovery and broke down the best focus, exposure, and shooting settings that I set my EOS R5 C camera to while capturing wildlife.
Let’s begin!
Focus Settings & Tips
Focus Peaking
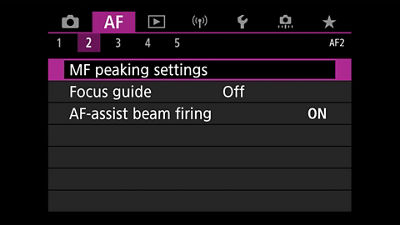
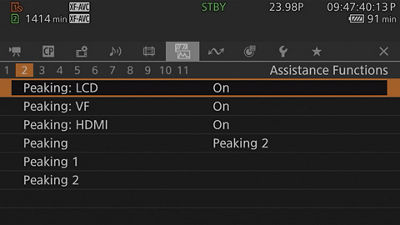
All focus peaking settings can be found in the “AF” menu, tab 2 in photo mode, and the “Assistance Functions” menu, tab 2 in video mode
What is it? Focus peaking is a false-color display that adds a colored or white highlight to the areas of the camera’s back screen or live view in real-time, that is sharpest and has the highest contrast, indicating full focus.
For the Canon EOS R5 C camera, focus peaking is offered in manual focus for photo mode and both manual and autofocus for video, making it incredibly useful for wildlife photographers and videographers who rely on autofocus for video.
Three Important Focus Peaking Tips:
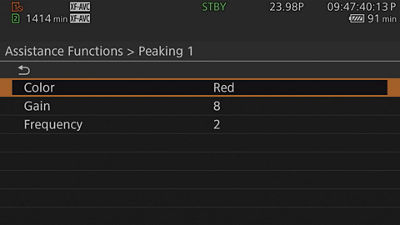
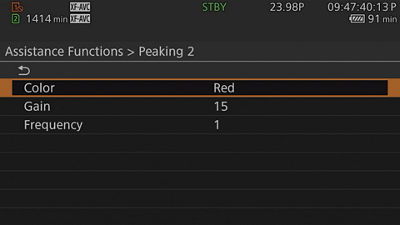
Choose the right sensitivity: The Canon EOS R5 C camera features two levels of focus peaking sensitivity, PEAK1 and PEAK2, which relate to the level of focus peaking sensitivity, with PEAK1 being less sensitive and PEAK2 being more sensitive. If you are shooting content with a shallower depth of field (like most footage is), PEAK2 will help determine focus better.
However, it’s important to note that if you are shooting anything with an aperture wider than f/2.8, focus peaking becomes far less accurate, when the depth of field is shallow and the background becomes softer.
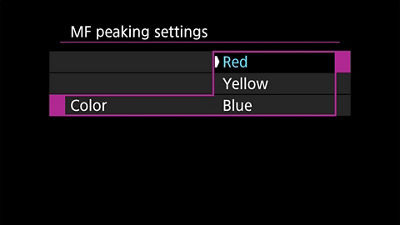
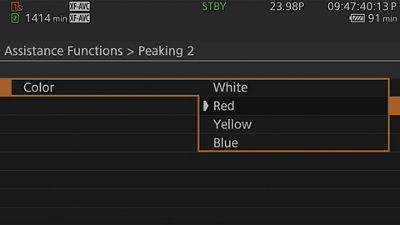
Choose a bright focus peaking color: On the R5 C, red, blue, and yellow are focus peaking color options in photo mode and video mode adds white as an option. Red typically is safest, since it stands out the best in most scenes, but as long as you choose a color that is bright and readable for your eyes on the screen, that’s what matters.
Turn on focus peaking in all viewing modes: The R5 C offers focus peaking on the LCD, viewfinder, and on a monitor, via HDMI output. Make sure these options are turned on, so you can utilize focus peaking in all viewing modes
Photo Autofocus Settings

All Photo Autofocus Settings can be found in the “AF” menu, tab
AF Operation: SERVO AF
There are two options for AF Operation in photo mode: One Shot AF and SERVO AF. While One Shot AF is great for non-moving subjects and compositions like landscapes, it doesn’t allow you to shift focus after you half-press the shutter, which can cause issues for fast-moving subjects, like wildlife. SERVO AF allows the Canon EOS R5 C camera to continue to switch focus, as long as you continue to half-press the shutter, to allow for greater focus accuracy.

AF Method: Face + Tracking
This focus method is essential for nailing focus with wildlife. It’s the first option for a reason and is the most reliable way to capture tact-sharp wildlife images.

Subject to Detect: Animals
Since the EOS R5 and R6 series of cameras, animal tracking AF has been available on select Canon cameras and uses deep learning and tracking to find and hold focus on animal subjects. When photographing wildlife, this feature should switched on.

Eye Detection: Enable
Eye detection is another way to provide greater accuracy with your autofocus and nail eye focus much easier–a crucial element of wildlife photography. This feature is especially helpful in maintaining focus in any inclement weather, like rain or snow, when a lot of cameras will continuously search and lose focus when autofocus is turned on.

Continuous AF: Enable
Continuous AF is similar to SERVO AF above. Once enabled, the camera will continuously focus on whatever the AF point is selected to focus on, whether it be animals, faces, or eyes. It’s something to have turned on, especially when you’re shooting a subject that is moving quickly.

Video Autofocus Settings
All Video Autofocus Settings can be found in the “Camera Setup” menu, tabs 4 and 5.
Continuous AF: Enable
Like the photo mode, when ContinousContinuous AF is turned on in video mode, it allows the camera to continuously find focus, based on what the AF point is set to and what the camera’s autofocus is set to prioritize (e.g. animals, people, eyes). This is important to have enabled, for continuously moving subjects, like wildlife.

AF Frame: Whole Area
While it’s more helpful to use single-point AF for capturing subjects like landscapes, when it comes to wildlife, if you want to consistently nail focus, it’s better to let the camera utilize as many focus points as possible. This is why selecting “Whole Area” is the best AF Frame setting for wildlife, since it uses all the camera’s focus points in the frame you’re filming.

AF Speed and Response: +1 to +2
When it comes to AF speed and response, you want it to be fast and snappy, capturing focus as quickly as possible to nail the shot. In this case, you’ll want to set both to between +1 and +2.

Face Detection & Tracking: On
This needs to be switched on, so the camera can focus on tracking the most important feature of the animal, the face, while allowing for even more complex features, like Face AF and Eye Detection settings.

Face AF: Face Priority
There are two options for Face AF: Face Priority and Face Only. While Face Only can be useful, it only focuses on the face and when it comes to wildlife, you want to have the freedom to focus on other parts of the frame, which makes Face Priority a better choice, thanks to its greater flexibility.

Eye Detection: On
Similar to photo mode, eye detection being turned on allows for nailing and maintaining focus in any weather or conditions, since the focus is so narrowly dialed into the eyes.

Head Detection Mode: Detect from Face/Head
There are two options for Head Detection Mode: Detect from Face/Head and Detect from Face. Again, while “Detect from Face” is helpful for portrait or “only face” focusing situations, selecting "Detect from Face/Head” allows for more flexibility to focus on the entire head and neck, which is important when filming most animals

Exposure Settings & Tips
When it comes to reading and understanding your exposure, there are certain tools that work much better for wildlife, that can be easily switched on and used on the Canon EOS R5 C camera. Let’s walk through those options.
Reading Photo Exposure
Light Meter: A light meter is a basic tool for reading exposure, on a range from -3 to +3, with -3 being underexposed, 0 being correct exposure, and +3 being overexposed. It’s also helpful because you can view this tool on your LCD and viewfinder, at the bottom of your screen. However, because it only shows a basic exposure reading of the entire picture, not where parts of the image are exposed and underexposed, it's best to not rely solely on the light meter for correct exposure.
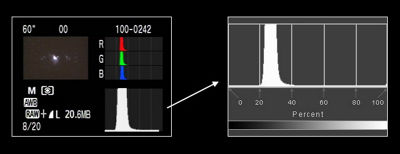
Histogram: The histogram is found on the Canon EOS R5 C’s LCD in live mode, in the top right-hand corner, and is a more accurate way of achieving accurate exposure throughout your image. From left to right, the histogram measures, blacks, shadows, midtones, highlights, and whites, with a correctly exposed image having the chart measuring in the center of the shadows, midtones, and highlights. This additional information helps with photographing wildlife, especially in extremely bright or dark situations (e.g. snowy conditions), and allows the photographer to capture more details in the shadows and highlights without clipping.
The histogram is turned on by cycling through the INFO button on the Canon EOS R5 C until the histogram is displayed.
Reading Video Exposure
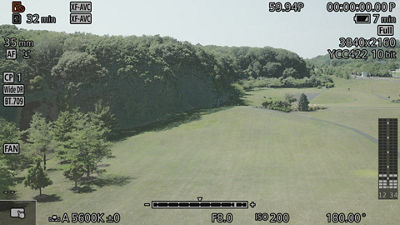
All three video exposure tools can be managed and enabled, either in the Assistance Functions menu or the Assistance Functions Easy Menu accessed in live mode, in the bottom right corner. All of these video exposure tools can also be viewed on the LCD screen in live mode, in the viewfinder, and on a monitor via HDMI output as well.
Zebras: An excellent video exposure tool, that not only help with exposure but properly expose your video based on your camera's midtone settings and the Canon Log you are shooting in.
The Canon EOS R5 C camera offers three Zebra settings, Zebra 1, Zebra 2, and Zebra 1 +2:
Zebra 1: Displays left-slanting stripes around areas of a set specified brightness, +/- 5. Typically, when dealing with a standard scene or wildlife, you would set Zebra 1 to 35% +/- 5, as this is Canon Log 3’s midtone value. You can adjust this though, based on your subject and 35-60% is a safe range for midtones in general.
Zebra 2: Displays right-slanting stripes over areas that exceed the specified brightness. A safe number to set for Zebra is 80%, which is the top level of your highlights before any clipping happens.
Zebra 1 +2: Shows both Zebras on the screen, accounting for set brightness and brightness that exceeds your highlights.
Zebras are very helpful, but come with one caveat. If you’re filming wildlife in bright, snowy settings, they can be more difficult to view on screen, so you might want to choose a different exposure tool in those conditions.
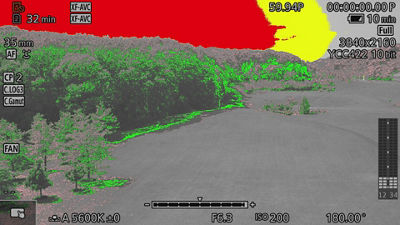
False Color: The opposite of zebras. It’s a color-coded filter displayed on your screen, with each color indicating an exposure setting.
For the Canon EOS R5 C camera, the color values are as follows:
- Red: White clipping
- Yellow: Just below white clipping
- Pink: One stop over 18% gray
- Green: 18% gray
- Blue: Just above black clipping
- Purple: Black clipping
While false color is a great, responsive, exposure tool, understanding the color values is important for it to seamlessly work with your video operation, or it’ll just look like an abstract art piece on your screen.
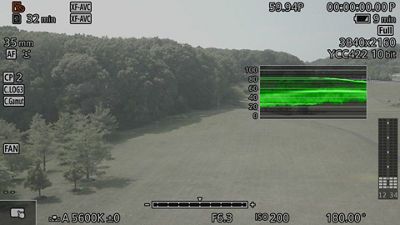
Waveform Monitor: Is viewed on the top right corner of the screen and is an excellent, active exposure tool for video. It measures brightness from 0 to 100, with 0 being underexposed and 100 being overexposed. But what makes the waveform monitor so useful is how it shows exposure throughout your image from left to right, so you can tell which parts of your frame is overexposed, making it much more responsive and dynamic for exposure control. This is one of the best ways to exposure correctly for wildlife because you can set your midtones and exposure around the animal and adjust from there.
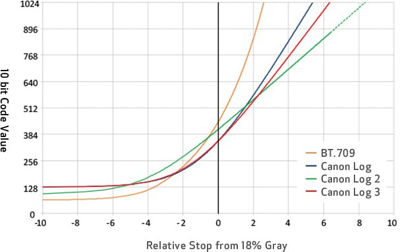
Exposing Correctly for Canon Log 3: The Canon EOS R5 C camera uses Canon Log 3, which is Canon’s latest Log format. It also has slightly higher exposure settings than the previous Canon Log 2 and Canon Log, so here are two important things to note when setting exposure:
The optimum ISO for Canon Log 3 is ISO 800, with a secondary option of ISO 3200, thanks to the EOS R5Cs dual native ISO functionality. This is different from past Canon Logs, which had an optimum ISO of ISO 400, and will make Canon Log 3 appear a bit more flat and washed out on screen (don’t fret, it still delivers fantastic dynamic range and color results).
Middle gray/midtone settings for Canon Log 3 is right around 35% (as the graph above shows). Make sure to set this in your Zebra 1 settings and remember this when viewing other video exposure tools on screen.
Best Video Recording Mode for Wildlife: The Canon EOS R5 C camera is known for its premiere video capabilities, including the capacity to shoot video up to 8K at 60 fps and 4K 120 at fps. That super slow-motion 4K120 is especially useful for fast-moving wildlife, where you want to slow it down and capture the incredible details of these animals in motion.
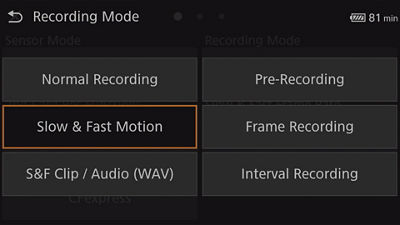
To shoot 4K120 on the Canon EOS R5 C camera, you have two recording mode options:
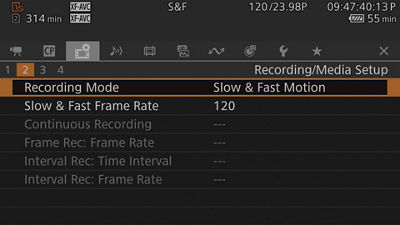
Slow & Fast Motion: Allows for slow motion 4K footage up to 120 fps but without audio.
S&F Clip / Audio (WAV) Allows for slow motion 4K footage up to 120 fps, with audio.
You can choose this recording mode, either in the Recording/Menu Setup menu, tab 2, or on the screen in live mode, at the top left corner, which pulls up the Recording/Menu shortcut menu (the quickest and best way to make any video recording changes on the EOS R5C camera).
Once you choose this recording mode and the frame rate you want, it will be displayed on the top center of the screen for reference.
One caveat to using the S&F Motion modes: While autofocus is still excellent while using S&F modes, features like continuous AF, eye tracking, and face detection are not available in either S&F mode. So know that going in, and if you need those more advanced AF features, sticking to 4K60 in Normal recording mode might be a better option.
Summary
The Canon EOS R5 C camera can seem intimidating at first, learning and balancing two different menu types and systems in a professional hybrid camera. But if you know the right settings and where to go to set up your camera for success, it can be one of the most rewarding cameras to shoot with, capturing incredible stills and videos of wildlife that you will certainly be proud of.
Now that we’ve walked through these important focus, exposure, and video recording settings, be sure to learn them, apply them, and watch your wildlife content improve as you adapt and grow with your new Canon EOS R5 C camera.

Thanks for signing up!
The application has encountered an unknown error. Please try again in a few minutes!
By clicking Sign Up, you are opting to receive promotional, educational, e-commerce and product registration emails from Canon USA. You can update your preferences or unsubscribe at anytime.